> ## Documentation Index
> Fetch the complete documentation index at: https://docs.altnautica.com/llms.txt
> Use this file to discover all available pages before exploring further.
# Your First Flight
> Connect, pre-flight check, arm, fly with a gamepad, land, and review. Step by step.
**Alpha stage.** This guide is based on bench-level testing only. Some steps may change as we validate on real hardware. Check back once we ship a stable release.
## What You Will Do
This guide walks you through a complete flight from your desk to the air and back. You will connect your flight controller to Mission Control, run pre-flight checks, arm, fly manually with a gamepad or keyboard, land safely, and review the flight data.
This guide assumes you have a properly built and tested drone. If your drone has never flown before, calibrate the accelerometer, compass, gyro, and RC channels first. See the [Calibration](/mission-control/calibration) section. Make sure your props are properly secured and your battery is charged.
## Before You Start
You need:
* A drone with an ArduPilot, PX4, Betaflight, or iNav flight controller
* A charged battery
* A USB cable (for bench/desktop connection) OR WiFi/4G connection (for field flight with the Drone Agent)
* A gamepad (Xbox, PlayStation, or any USB/Bluetooth controller) or your keyboard
* Mission Control running in your browser (see [Quickstart](/getting-started/quickstart-mission-control))
You can fly with just a keyboard (WASD + arrow keys), but a gamepad gives you analog stick precision. Any controller that works with the Web Gamepad API will work. Xbox controllers are the most widely tested.
## Step by Step
**USB connection (bench/desktop):**
1. Plug the FC into your laptop with a USB cable
2. Open Mission Control at `http://localhost:4000`
3. Click **Connect** in the top bar
4. Select the serial port in the browser dialog
5. Wait for the connection handshake (2-5 seconds)
**Over the agent (field):**
1. Power on the drone. The Drone Agent starts automatically.
2. Connect your laptop to the same network (WiFi, USB tether, or Ground Agent AP)
3. Open Mission Control. It discovers the agent via mDNS or you enter the IP manually.
4. The drone appears on the dashboard.
The top bar will show: firmware type, vehicle type, and firmware version. The status indicator turns green.
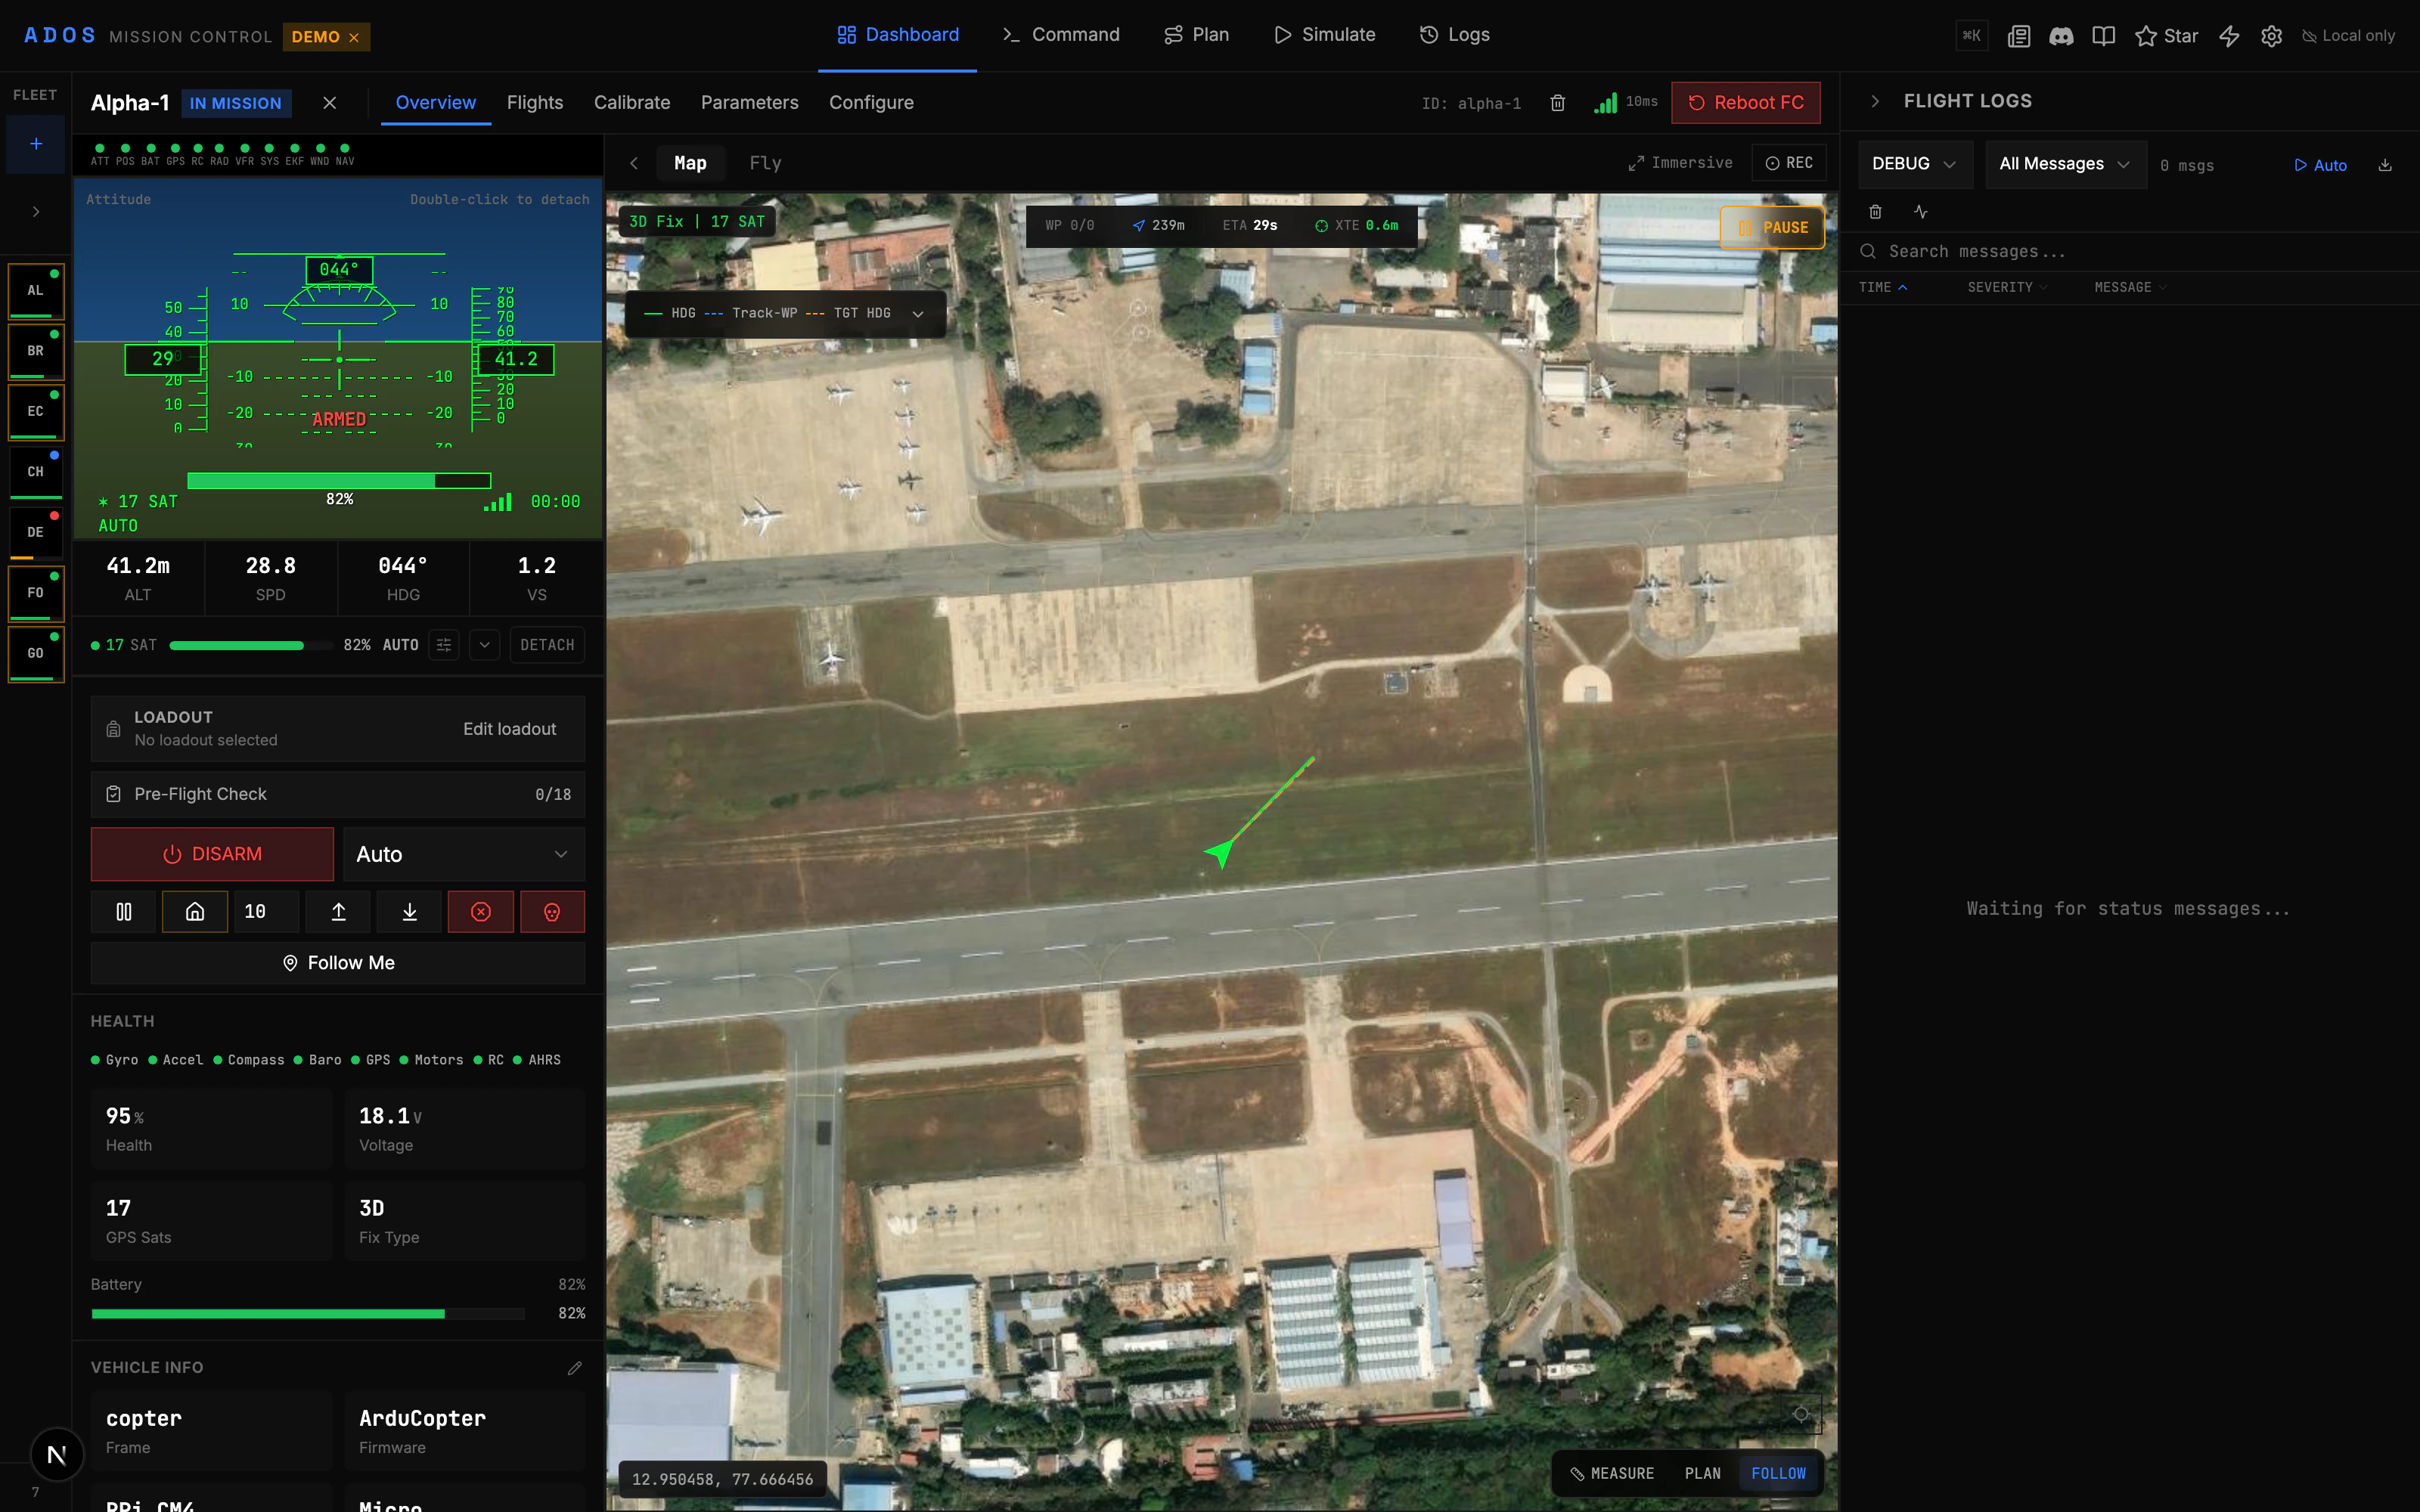 Before arming, verify these in the dashboard:
**GPS:**
* Fix type should be **3D Fix** or better (RTK if available)
* Satellite count: 8+ recommended, 6 minimum
* HDOP under 2.0
**Battery:**
* Voltage matches your expected full charge (e.g., 25.2V for 6S LiPo)
* Percentage reads above 80% for a full flight
* Current sensor reads near 0A (motors not spinning)
**Attitude:**
* Artificial horizon is level when the drone is on flat ground
* If it is tilted, you need to calibrate the accelerometer
**RC (if using external RC transmitter):**
* All channel values respond when you move sticks
* Throttle at minimum, all trims centered
**Flight mode:**
* Should show **Stabilize** or **Altitude Hold** for first flights
* Do not arm in Auto, Guided, or Loiter for your first flight
**Pre-arm messages:**
* Check the message bar at the bottom of the screen
* ArduPilot shows pre-arm failure reasons here (e.g., "PreArm: Need 3D Fix", "PreArm: Compass not calibrated")
* Resolve ALL pre-arm failures before arming
If you see "PreArm: RC not calibrated", go to Configure > Calibration > RC Calibration and follow the wizard. If you see compass errors, run compass calibration. These one-time steps take 2-3 minutes each.
**Gamepad:**
1. Plug in or pair your gamepad
2. Go to the **Flight Control** tab
3. The gamepad should appear as detected. If not, press any button to wake it up.
4. Mission Control maps the sticks automatically:
* Left stick vertical: Throttle
* Left stick horizontal: Yaw
* Right stick vertical: Pitch
* Right stick horizontal: Roll
5. Move all sticks to verify they respond in the UI
**Keyboard:**
* `W/S`: Pitch forward/back
* `A/D`: Roll left/right
* `Arrow Up/Down`: Throttle up/down
* `Arrow Left/Right`: Yaw left/right
Gamepad input runs at 50Hz using the Web Gamepad API. This sends MANUAL\_CONTROL MAVLink messages to the flight controller. Make sure your FC is configured to accept MAVLink manual control (ArduPilot: set `PILOT_THR_BHV` and RC channel overrides are enabled by default on companion computer connections).
When all pre-flight checks pass and the pre-arm message bar is clear:
1. Move to a safe distance from the drone. Props will spin on arming.
2. Click the **Arm** button in the Flight Control tab
3. Confirm the arming dialog
The status indicator changes to show **ARMED**. The motors may start spinning at idle (depends on your `MOT_SPIN_ARM` parameter).
If arming fails, the message bar will show the reason. Common failures:
* "PreArm: Need 3D Fix" (wait for GPS lock)
* "PreArm: Battery failsafe" (battery too low)
* "PreArm: Compass variance" (move away from metal objects, recalibrate)
* "PreArm: Gyros inconsistent" (let the FC warm up for 30 seconds)
Before arming, verify these in the dashboard:
**GPS:**
* Fix type should be **3D Fix** or better (RTK if available)
* Satellite count: 8+ recommended, 6 minimum
* HDOP under 2.0
**Battery:**
* Voltage matches your expected full charge (e.g., 25.2V for 6S LiPo)
* Percentage reads above 80% for a full flight
* Current sensor reads near 0A (motors not spinning)
**Attitude:**
* Artificial horizon is level when the drone is on flat ground
* If it is tilted, you need to calibrate the accelerometer
**RC (if using external RC transmitter):**
* All channel values respond when you move sticks
* Throttle at minimum, all trims centered
**Flight mode:**
* Should show **Stabilize** or **Altitude Hold** for first flights
* Do not arm in Auto, Guided, or Loiter for your first flight
**Pre-arm messages:**
* Check the message bar at the bottom of the screen
* ArduPilot shows pre-arm failure reasons here (e.g., "PreArm: Need 3D Fix", "PreArm: Compass not calibrated")
* Resolve ALL pre-arm failures before arming
If you see "PreArm: RC not calibrated", go to Configure > Calibration > RC Calibration and follow the wizard. If you see compass errors, run compass calibration. These one-time steps take 2-3 minutes each.
**Gamepad:**
1. Plug in or pair your gamepad
2. Go to the **Flight Control** tab
3. The gamepad should appear as detected. If not, press any button to wake it up.
4. Mission Control maps the sticks automatically:
* Left stick vertical: Throttle
* Left stick horizontal: Yaw
* Right stick vertical: Pitch
* Right stick horizontal: Roll
5. Move all sticks to verify they respond in the UI
**Keyboard:**
* `W/S`: Pitch forward/back
* `A/D`: Roll left/right
* `Arrow Up/Down`: Throttle up/down
* `Arrow Left/Right`: Yaw left/right
Gamepad input runs at 50Hz using the Web Gamepad API. This sends MANUAL\_CONTROL MAVLink messages to the flight controller. Make sure your FC is configured to accept MAVLink manual control (ArduPilot: set `PILOT_THR_BHV` and RC channel overrides are enabled by default on companion computer connections).
When all pre-flight checks pass and the pre-arm message bar is clear:
1. Move to a safe distance from the drone. Props will spin on arming.
2. Click the **Arm** button in the Flight Control tab
3. Confirm the arming dialog
The status indicator changes to show **ARMED**. The motors may start spinning at idle (depends on your `MOT_SPIN_ARM` parameter).
If arming fails, the message bar will show the reason. Common failures:
* "PreArm: Need 3D Fix" (wait for GPS lock)
* "PreArm: Battery failsafe" (battery too low)
* "PreArm: Compass variance" (move away from metal objects, recalibrate)
* "PreArm: Gyros inconsistent" (let the FC warm up for 30 seconds)
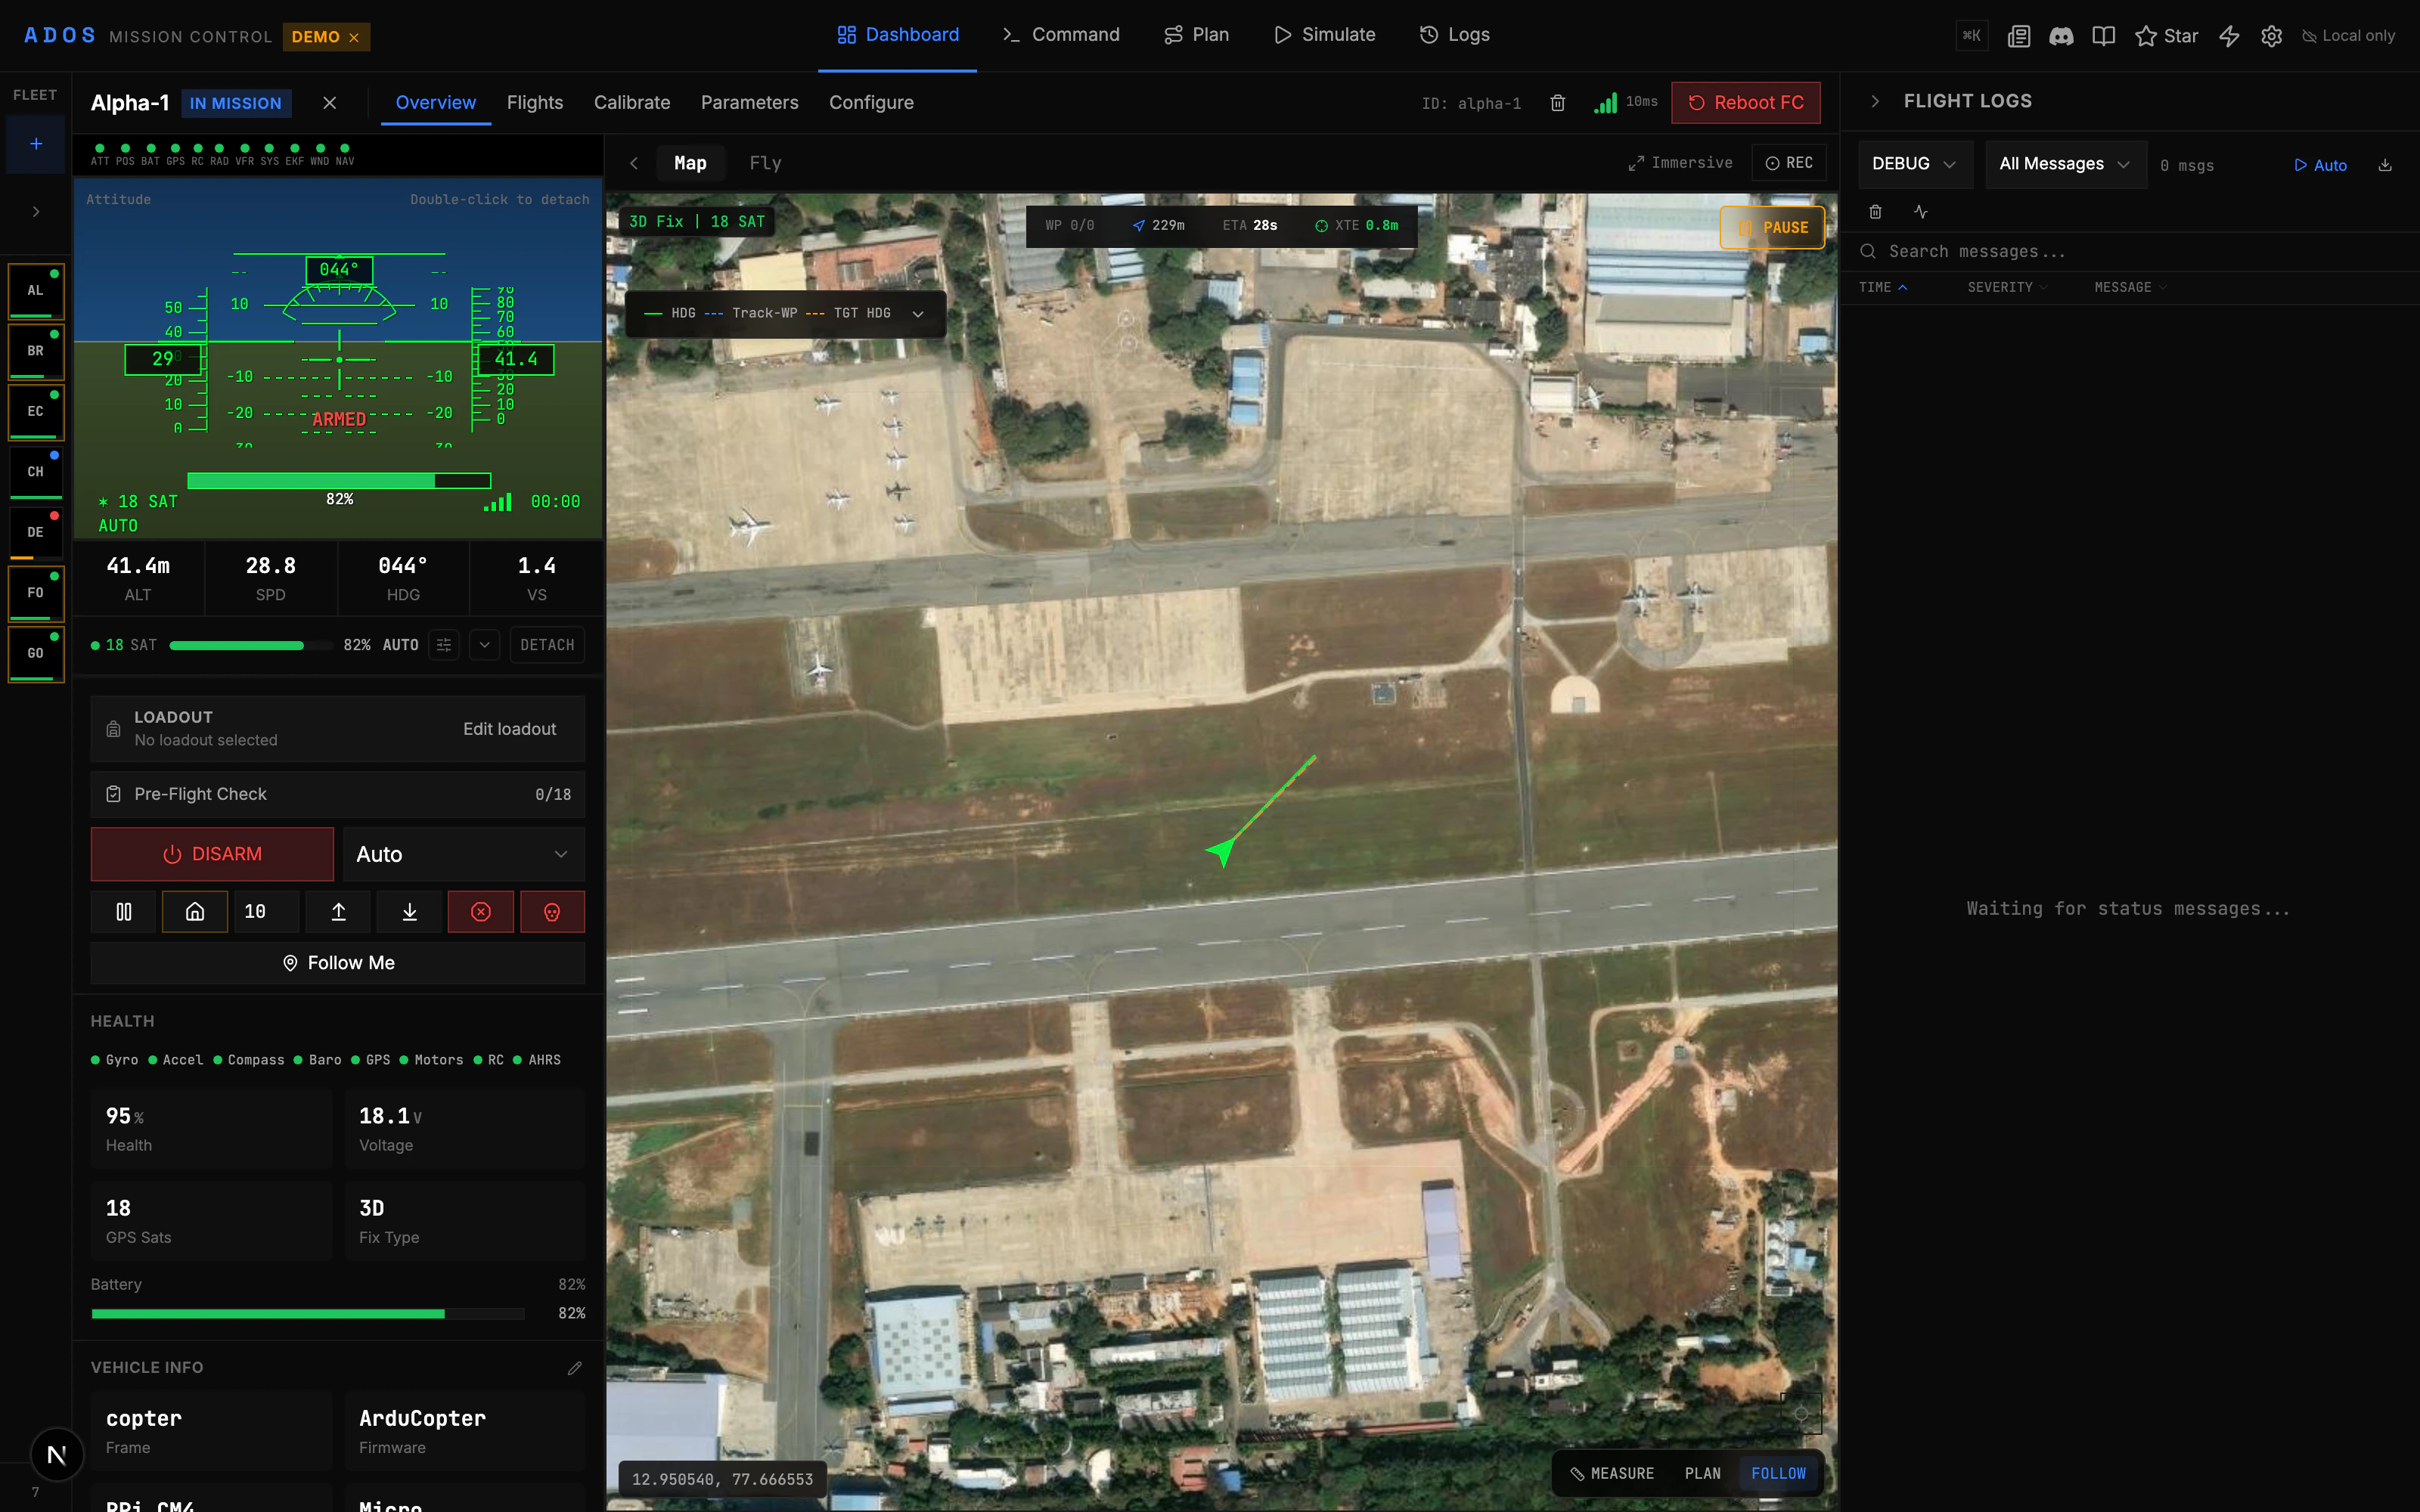 **In Stabilize mode:**
* Slowly raise the throttle stick (left stick up, or Arrow Up on keyboard)
* The drone will lift off when throttle passes the hover point (usually around 40-60%)
* Keep the throttle steady once airborne. Small corrections with pitch and roll.
**In Altitude Hold or Loiter mode:**
* Throttle stick center = hold altitude
* Throttle above center = climb
* Throttle below center = descend
* These modes are easier for beginners because the FC handles altitude
For your first flight, use **Altitude Hold** mode if your FC supports it. Set the mode before arming. In this mode, releasing the throttle stick returns to hover. You only need to worry about position, not altitude.
Start low. Hover at 2-3 meters. Get comfortable with the controls before climbing higher.
With the drone hovering:
* **Pitch** (right stick vertical): Forward and backward movement
* **Roll** (right stick horizontal): Left and right movement
* **Yaw** (left stick horizontal): Rotate the drone's heading
* **Throttle** (left stick vertical): Up and down
Keep movements gentle. FPV-style quick stick inputs will work, but start slow.
Watch the telemetry in Mission Control while flying:
* Altitude (AGL or MSL, depending on your setting)
* Ground speed
* Battery voltage (watch for sag under load)
* Distance from home
* Flight mode
If anything feels wrong, switch to **Loiter** mode. The drone will stop and hold position. This is your panic button.
You can change flight modes during flight from Mission Control.
Common modes for manual flight:
| Mode | Behavior |
| ------------- | ---------------------------------------------------------------------------- |
| Stabilize | Full manual control. FC only levels the drone when sticks are centered. |
| Altitude Hold | FC holds altitude. You control position and heading. |
| Loiter | FC holds position AND altitude. GPS required. You nudge it around. |
| PosHold | Similar to Loiter but uses only accelerometer for position. Indoor-friendly. |
Click the mode selector in the Flight Control tab to switch. The FC will acknowledge with a mode change message.
**Manual landing (Stabilize / AltHold):**
1. Position the drone over your landing spot
2. Slowly lower the throttle
3. Descend gently (0.5-1 m/s descent rate)
4. When the drone touches down, pull throttle to minimum and hold for 2 seconds
5. The FC auto-disarms after touchdown if `DISARM_DELAY` is set (default: 10 seconds)
**Automatic landing:**
1. Switch to **Land** mode
2. The drone descends at a controlled rate and auto-disarms on touchdown
**Return to Launch (RTL):**
1. Switch to **RTL** mode
2. The drone climbs to RTL altitude, flies back to the launch point, and lands
3. Requires GPS
After landing, click **Disarm** if the FC has not auto-disarmed.
After landing and disarming:
**In Mission Control:**
* The flight path is drawn on the map (if GPS was available)
* Telemetry data is available in the stores for the duration of the session
**On the flight controller:**
* ArduPilot logs to onboard flash (`.bin` files)
* Download logs via Mission Control's log browser or with a USB cable
* Upload logs to [firmware.ardupilot.org](https://firmware.ardupilot.org) for analysis
**Check battery health:**
* Note the voltage after landing. If it dropped below 3.5V per cell under load, your battery may be aging.
* If the FC triggered a battery failsafe, reduce your flight time on the next flight.
## Common First-Flight Issues
### Drone drifts in one direction
Your compass may need calibration, or there is magnetic interference. Move the drone away from metal objects and recalibrate. Also check that the FC is mounted correctly (arrow pointing forward).
### Drone oscillates or vibrates
PID tuning may be off for your frame. Start with ArduPilot's Autotune feature (switch to Autotune mode mid-flight and let the FC tune itself). Or adjust PIDs manually in Configure > PID Tuning.
### Gamepad input feels laggy
Check that Mission Control is running in Chrome or Edge. Firefox has higher Web Gamepad API latency. Also verify the gamepad is connected via USB, not Bluetooth, for the lowest latency.
### Video feed is frozen or black
If using the Drone Agent's video pipeline:
```bash theme={"theme":{"light":"github-light","dark":"github-dark"}}
# On the SBC, check video service
ados status
journalctl -u ados-video -n 20 --no-pager
```
In Mission Control, try switching the video transport mode (click the transport pill on the video feed).
### Arming fails with "Check firmware"
Make sure you are using a supported firmware. Mission Control works with ArduPilot 4.0+, PX4 1.12+, Betaflight 4.3+, and iNav 7.0+.
## Safety Reminders
* Always arm at a safe distance from people and objects
* Start with short, low flights until you are comfortable
* Keep a visual line of sight to your drone
* Know your failsafe settings (what happens on RC loss, GCS loss, battery low)
* Fly in an open area away from airports, restricted zones, and crowds
* Check local regulations before flying
## Next Steps
Plan and execute an automated survey mission.
Advanced flight control: guided mode, follow-me waypoints, HOTAS setup.
Tune your drone: PIDs, failsafes, power, sensors.
Set up live video from your drone.
**In Stabilize mode:**
* Slowly raise the throttle stick (left stick up, or Arrow Up on keyboard)
* The drone will lift off when throttle passes the hover point (usually around 40-60%)
* Keep the throttle steady once airborne. Small corrections with pitch and roll.
**In Altitude Hold or Loiter mode:**
* Throttle stick center = hold altitude
* Throttle above center = climb
* Throttle below center = descend
* These modes are easier for beginners because the FC handles altitude
For your first flight, use **Altitude Hold** mode if your FC supports it. Set the mode before arming. In this mode, releasing the throttle stick returns to hover. You only need to worry about position, not altitude.
Start low. Hover at 2-3 meters. Get comfortable with the controls before climbing higher.
With the drone hovering:
* **Pitch** (right stick vertical): Forward and backward movement
* **Roll** (right stick horizontal): Left and right movement
* **Yaw** (left stick horizontal): Rotate the drone's heading
* **Throttle** (left stick vertical): Up and down
Keep movements gentle. FPV-style quick stick inputs will work, but start slow.
Watch the telemetry in Mission Control while flying:
* Altitude (AGL or MSL, depending on your setting)
* Ground speed
* Battery voltage (watch for sag under load)
* Distance from home
* Flight mode
If anything feels wrong, switch to **Loiter** mode. The drone will stop and hold position. This is your panic button.
You can change flight modes during flight from Mission Control.
Common modes for manual flight:
| Mode | Behavior |
| ------------- | ---------------------------------------------------------------------------- |
| Stabilize | Full manual control. FC only levels the drone when sticks are centered. |
| Altitude Hold | FC holds altitude. You control position and heading. |
| Loiter | FC holds position AND altitude. GPS required. You nudge it around. |
| PosHold | Similar to Loiter but uses only accelerometer for position. Indoor-friendly. |
Click the mode selector in the Flight Control tab to switch. The FC will acknowledge with a mode change message.
**Manual landing (Stabilize / AltHold):**
1. Position the drone over your landing spot
2. Slowly lower the throttle
3. Descend gently (0.5-1 m/s descent rate)
4. When the drone touches down, pull throttle to minimum and hold for 2 seconds
5. The FC auto-disarms after touchdown if `DISARM_DELAY` is set (default: 10 seconds)
**Automatic landing:**
1. Switch to **Land** mode
2. The drone descends at a controlled rate and auto-disarms on touchdown
**Return to Launch (RTL):**
1. Switch to **RTL** mode
2. The drone climbs to RTL altitude, flies back to the launch point, and lands
3. Requires GPS
After landing, click **Disarm** if the FC has not auto-disarmed.
After landing and disarming:
**In Mission Control:**
* The flight path is drawn on the map (if GPS was available)
* Telemetry data is available in the stores for the duration of the session
**On the flight controller:**
* ArduPilot logs to onboard flash (`.bin` files)
* Download logs via Mission Control's log browser or with a USB cable
* Upload logs to [firmware.ardupilot.org](https://firmware.ardupilot.org) for analysis
**Check battery health:**
* Note the voltage after landing. If it dropped below 3.5V per cell under load, your battery may be aging.
* If the FC triggered a battery failsafe, reduce your flight time on the next flight.
## Common First-Flight Issues
### Drone drifts in one direction
Your compass may need calibration, or there is magnetic interference. Move the drone away from metal objects and recalibrate. Also check that the FC is mounted correctly (arrow pointing forward).
### Drone oscillates or vibrates
PID tuning may be off for your frame. Start with ArduPilot's Autotune feature (switch to Autotune mode mid-flight and let the FC tune itself). Or adjust PIDs manually in Configure > PID Tuning.
### Gamepad input feels laggy
Check that Mission Control is running in Chrome or Edge. Firefox has higher Web Gamepad API latency. Also verify the gamepad is connected via USB, not Bluetooth, for the lowest latency.
### Video feed is frozen or black
If using the Drone Agent's video pipeline:
```bash theme={"theme":{"light":"github-light","dark":"github-dark"}}
# On the SBC, check video service
ados status
journalctl -u ados-video -n 20 --no-pager
```
In Mission Control, try switching the video transport mode (click the transport pill on the video feed).
### Arming fails with "Check firmware"
Make sure you are using a supported firmware. Mission Control works with ArduPilot 4.0+, PX4 1.12+, Betaflight 4.3+, and iNav 7.0+.
## Safety Reminders
* Always arm at a safe distance from people and objects
* Start with short, low flights until you are comfortable
* Keep a visual line of sight to your drone
* Know your failsafe settings (what happens on RC loss, GCS loss, battery low)
* Fly in an open area away from airports, restricted zones, and crowds
* Check local regulations before flying
## Next Steps
Plan and execute an automated survey mission.
Advanced flight control: guided mode, follow-me waypoints, HOTAS setup.
Tune your drone: PIDs, failsafes, power, sensors.
Set up live video from your drone.