> ## Documentation Index
> Fetch the complete documentation index at: https://docs.altnautica.com/llms.txt
> Use this file to discover all available pages before exploring further.
# Cockpit and Skills
> Fly from the Mission Control Cockpit tab: video, HUD, the Skill Bar and its confirmations, default hotkeys, gamepad stick control and loadouts.
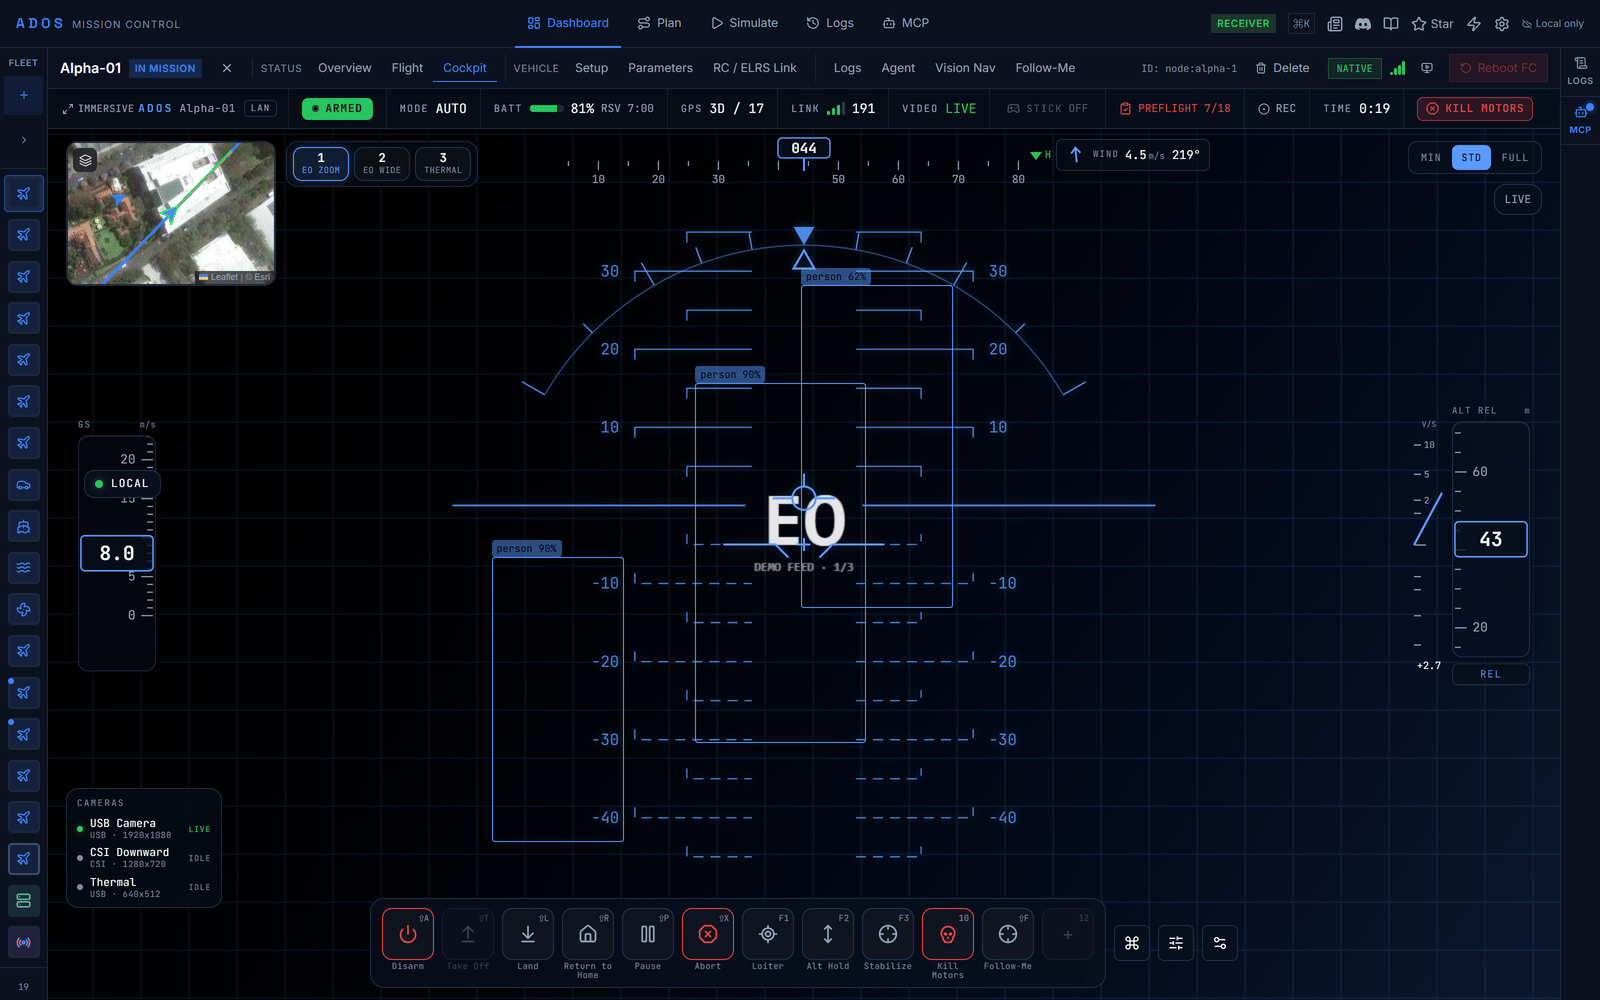
The Cockpit is a drone's full-screen piloting surface: live video under a HUD, a safety band across the top, and a Skill Bar of flight actions you fire by click, key or gamepad button.
The Cockpit commands a real aircraft: arming, takeoff, mode changes and stick control all reach the flight controller. Read [Safety](/operations/safety) before you fly.
 ## Open the cockpit
* Select a drone and open its **Cockpit** tab.
* Or click **Open cockpit** (the monitor icon) in the node header, or choose **Open Cockpit** in the command palette (Ctrl+K or ⌘K). Both open the Cockpit in immersive mode.
A ground station also has a **Cockpit** tab; it hands over to the drone the ground station carries (**Fly {name}**).
## Layout
* **Safety band** (top, always shown): exit or **Immersive**, the node name, a reach badge (**DIRECT**, **LAN**, **VIA GROUND** or **CLOUD**), flight and video stats, then the **STICK** chip, the **PREFLIGHT {done}/18** chip, **REC**, **TIME** since arming, and **Kill Motors** at the far right.
* **Stream tabs**: shown when the drone has more than one video stream. Press 1 to 9 to pick a stream, or the backtick key to cycle. A stream with no signal is struck through and cannot be selected.
* **Picture-in-picture**: press P to show a second live stream in a draggable inset. It needs two or more live streams. Its position is saved per loadout.
* **Minimap**: a small map at the top left. Click it to leave immersive mode and open the Flight tab.
* **HUD**: artificial horizon, heading tape with a home caret, speed and altitude tapes, vertical speed and wind. A missing reading shows a dash, never zero. The altitude reference toggles between **REL** and **MSL**.
* **Density**: **Min** shows only the instruments and the safety band, **Std** (the default) adds the standard cards, **Full** shows everything.
* **REC**: records the flight, video and telemetry together. Click again to stop.
Video transport and stream details are on [Video feed](/mission-control/video-feed).
## Skill bar and confirmations
The Skill Bar has 12 slots. Each slot shows its hotkey chip (for example ⇧A or F1) and its name; hover for the effect, state and binding. On a narrow window, slots beyond six move behind **More skills**.
Every flight action goes through one confirmation sheet, whether you fire it from the Skill Bar, a hotkey, a gamepad button, the [Flight tab](/mission-control/flight-control), the command palette or the [Nodes view](/mission-control/nodes-fleet-view). The sheet names the drone it will command and re-checks the drone's state before sending.
| Skill | Confirmation |
| - | - |
| Arm | **Slide** to the end, or hold Enter or the gamepad button for 1.5 s |
| Disarm, Take off, Land, Return to Home, Resume, Abort | **Hold** for 0.8 s |
| Kill Motors | **Guarded**: the guard arms when the sheet opens, and a 1.5 s hold must start within 3 s, or the request cancels |
| Pause | None |
| Mode change | None for Loiter, Brake, Alt Hold, PosHold, QLoiter, QHover and FlowHold. Slide for Auto. Hold for every other mode. |
Take off arms the vehicle and climbs to the takeoff altitude set on the Flight tab (1 to 120 m, default 10 m).
**Checklist override.** If this drone's pre-flight checklist has open or failed items, the Arm and Take off sheets list them and stay inert until you turn on **Override checklist**. The override is recorded as a safety event.
**Stale link.** When the flight controller's heartbeat is older than 3 seconds, every Skill is disabled except **Kill Motors**, **Return to Home** and **Land**. Those stay available with the warning **Link stale: sent without confirmation of receipt**, and the sheet notes that the vehicle may not receive the command.
Press Esc or **Cancel** to decline a sheet.
## Default hotkeys
The **Default** loadout binds:
| Skill | Key | Gamepad button (standard mapping) |
| - | - | - |
| Arm, and Disarm while armed | Shift+A | A (0) |
| Take off | Shift+T | none |
| Land | Shift+L | X (2) |
| Return to Home | Shift+R | B (1) |
| Pause, and Resume a paused mission | Shift+P | Y (3) |
| Abort | Shift+X | none |
| Loiter | F1 | none |
| Alt Hold | F2 | none |
| Stabilize | F3 | none |
| Kill Motors | Unbound | Unbound |
Kill Motors sits in a slot but has no key or button, so it cannot fire by accident. Use the slot, the **Kill Motors** button on the safety band, or bind it yourself.
Hotkeys and buttons fire only while a drone's **Flight** or **Cockpit** tab is open. They pause while a confirmation sheet, the binding editor, the command palette, the radial menu or quick settings is open, and keys typed into text fields are ignored.
Cockpit keys that cannot be rebound:
| Input | Action |
| - | - |
| Ctrl+K or ⌘K | Command palette |
| Esc | Close the open sheet or editor, then leave immersive mode |
| 1 to 9, backtick | Pick or cycle the video stream |
| P | Picture-in-picture |
| Shift+, | Quick settings |
| Gamepad L1+R1 | Quick settings |
| Gamepad Select (hold) | Radial Skill menu, aimed with the D-pad up and down |
| Gamepad D-pad left and right | Cycle the video stream |
| Gamepad Start | Leave immersive mode |
## Gamepad and stick control
A gamepad can fly the drone with `MANUAL_CONTROL` (or `MSP_SET_RAW_RC` on a Betaflight or iNav link). Sticks are sent only from the Cockpit tab, and only when all of these hold:
1. Stick control is on: the **STICK** chip in the safety band, or **Stick control** in **Settings → Input Devices**. It starts off every session and turns off when the gamepad disconnects.
2. A gamepad is reporting.
3. The drone is connected.
4. The drone is armed.
5. The flight mode gives the pilot the sticks: STABILIZE, ACRO, ALT\_HOLD, MANUAL, POSHOLD, LOITER, SPORT, DRIFT, FLOWHOLD, FBWA, FBWB, CRUISE, TRAINING, QSTABILIZE, QHOVER, QLOITER or QACRO.
When any condition fails, the chip reads **BLOCKED** with the reason and nothing is sent. The rate follows the link, up to 50 Hz; a link that cannot carry stick input sends nothing. On an MSP link, the flight controller must use the MSP receiver, and the override then drives every RC channel. Stick mode is Mode 2 (throttle on the left stick) by default; switch to Mode 1 under **Settings → Input Devices**.
## Loadouts and bindings
A loadout holds the 12 Skill slots with their key and button bindings, plus the cockpit layout and density. Manage loadouts and bindings in **Settings → Input Devices → Skill & Keyboard Bindings**: pick a preset, **Save preset**, click **Press a key…** or **Press a button…** to capture a binding, **Apply controller defaults** to restore the standard gamepad buttons, or **Reset to defaults**.
## Layout editor
Click **Edit skill bar bindings** at the side of the Skill Bar. The bar turns into the editor and flight dispatch pauses while it is open.
* Drag a Skill onto a slot to bind it, or click a slot and press a key or gamepad button.
* Drag a slot onto the clear zone to empty it.
* Under **Cockpit layout**, turn the **Top bar**, **Minimap**, **Telemetry strip** and **Proximity radar** on or off, and move each widget to a screen zone.
Click **Done** to save to the active loadout.
## Immersive mode
**Immersive** (on the safety band) takes the Cockpit full screen, hides the top bar and Fleet sidebar, and keeps the screen awake. Leave it with Esc, the exit chevron, gamepad Start, a click on the minimap, or by switching tabs.
## Next steps
Pre-flight checks and safe operating practice.
Instruments, map, Fly Here and the action panel.
Transports, streams and recording.
Build a mission to fly from here.
This documentation is built and hosted on [Mintlify](https://mintlify.com), a developer documentation platform.
## Open the cockpit
* Select a drone and open its **Cockpit** tab.
* Or click **Open cockpit** (the monitor icon) in the node header, or choose **Open Cockpit** in the command palette (Ctrl+K or ⌘K). Both open the Cockpit in immersive mode.
A ground station also has a **Cockpit** tab; it hands over to the drone the ground station carries (**Fly {name}**).
## Layout
* **Safety band** (top, always shown): exit or **Immersive**, the node name, a reach badge (**DIRECT**, **LAN**, **VIA GROUND** or **CLOUD**), flight and video stats, then the **STICK** chip, the **PREFLIGHT {done}/18** chip, **REC**, **TIME** since arming, and **Kill Motors** at the far right.
* **Stream tabs**: shown when the drone has more than one video stream. Press 1 to 9 to pick a stream, or the backtick key to cycle. A stream with no signal is struck through and cannot be selected.
* **Picture-in-picture**: press P to show a second live stream in a draggable inset. It needs two or more live streams. Its position is saved per loadout.
* **Minimap**: a small map at the top left. Click it to leave immersive mode and open the Flight tab.
* **HUD**: artificial horizon, heading tape with a home caret, speed and altitude tapes, vertical speed and wind. A missing reading shows a dash, never zero. The altitude reference toggles between **REL** and **MSL**.
* **Density**: **Min** shows only the instruments and the safety band, **Std** (the default) adds the standard cards, **Full** shows everything.
* **REC**: records the flight, video and telemetry together. Click again to stop.
Video transport and stream details are on [Video feed](/mission-control/video-feed).
## Skill bar and confirmations
The Skill Bar has 12 slots. Each slot shows its hotkey chip (for example ⇧A or F1) and its name; hover for the effect, state and binding. On a narrow window, slots beyond six move behind **More skills**.
Every flight action goes through one confirmation sheet, whether you fire it from the Skill Bar, a hotkey, a gamepad button, the [Flight tab](/mission-control/flight-control), the command palette or the [Nodes view](/mission-control/nodes-fleet-view). The sheet names the drone it will command and re-checks the drone's state before sending.
| Skill | Confirmation |
| - | - |
| Arm | **Slide** to the end, or hold Enter or the gamepad button for 1.5 s |
| Disarm, Take off, Land, Return to Home, Resume, Abort | **Hold** for 0.8 s |
| Kill Motors | **Guarded**: the guard arms when the sheet opens, and a 1.5 s hold must start within 3 s, or the request cancels |
| Pause | None |
| Mode change | None for Loiter, Brake, Alt Hold, PosHold, QLoiter, QHover and FlowHold. Slide for Auto. Hold for every other mode. |
Take off arms the vehicle and climbs to the takeoff altitude set on the Flight tab (1 to 120 m, default 10 m).
**Checklist override.** If this drone's pre-flight checklist has open or failed items, the Arm and Take off sheets list them and stay inert until you turn on **Override checklist**. The override is recorded as a safety event.
**Stale link.** When the flight controller's heartbeat is older than 3 seconds, every Skill is disabled except **Kill Motors**, **Return to Home** and **Land**. Those stay available with the warning **Link stale: sent without confirmation of receipt**, and the sheet notes that the vehicle may not receive the command.
Press Esc or **Cancel** to decline a sheet.
## Default hotkeys
The **Default** loadout binds:
| Skill | Key | Gamepad button (standard mapping) |
| - | - | - |
| Arm, and Disarm while armed | Shift+A | A (0) |
| Take off | Shift+T | none |
| Land | Shift+L | X (2) |
| Return to Home | Shift+R | B (1) |
| Pause, and Resume a paused mission | Shift+P | Y (3) |
| Abort | Shift+X | none |
| Loiter | F1 | none |
| Alt Hold | F2 | none |
| Stabilize | F3 | none |
| Kill Motors | Unbound | Unbound |
Kill Motors sits in a slot but has no key or button, so it cannot fire by accident. Use the slot, the **Kill Motors** button on the safety band, or bind it yourself.
Hotkeys and buttons fire only while a drone's **Flight** or **Cockpit** tab is open. They pause while a confirmation sheet, the binding editor, the command palette, the radial menu or quick settings is open, and keys typed into text fields are ignored.
Cockpit keys that cannot be rebound:
| Input | Action |
| - | - |
| Ctrl+K or ⌘K | Command palette |
| Esc | Close the open sheet or editor, then leave immersive mode |
| 1 to 9, backtick | Pick or cycle the video stream |
| P | Picture-in-picture |
| Shift+, | Quick settings |
| Gamepad L1+R1 | Quick settings |
| Gamepad Select (hold) | Radial Skill menu, aimed with the D-pad up and down |
| Gamepad D-pad left and right | Cycle the video stream |
| Gamepad Start | Leave immersive mode |
## Gamepad and stick control
A gamepad can fly the drone with `MANUAL_CONTROL` (or `MSP_SET_RAW_RC` on a Betaflight or iNav link). Sticks are sent only from the Cockpit tab, and only when all of these hold:
1. Stick control is on: the **STICK** chip in the safety band, or **Stick control** in **Settings → Input Devices**. It starts off every session and turns off when the gamepad disconnects.
2. A gamepad is reporting.
3. The drone is connected.
4. The drone is armed.
5. The flight mode gives the pilot the sticks: STABILIZE, ACRO, ALT\_HOLD, MANUAL, POSHOLD, LOITER, SPORT, DRIFT, FLOWHOLD, FBWA, FBWB, CRUISE, TRAINING, QSTABILIZE, QHOVER, QLOITER or QACRO.
When any condition fails, the chip reads **BLOCKED** with the reason and nothing is sent. The rate follows the link, up to 50 Hz; a link that cannot carry stick input sends nothing. On an MSP link, the flight controller must use the MSP receiver, and the override then drives every RC channel. Stick mode is Mode 2 (throttle on the left stick) by default; switch to Mode 1 under **Settings → Input Devices**.
## Loadouts and bindings
A loadout holds the 12 Skill slots with their key and button bindings, plus the cockpit layout and density. Manage loadouts and bindings in **Settings → Input Devices → Skill & Keyboard Bindings**: pick a preset, **Save preset**, click **Press a key…** or **Press a button…** to capture a binding, **Apply controller defaults** to restore the standard gamepad buttons, or **Reset to defaults**.
## Layout editor
Click **Edit skill bar bindings** at the side of the Skill Bar. The bar turns into the editor and flight dispatch pauses while it is open.
* Drag a Skill onto a slot to bind it, or click a slot and press a key or gamepad button.
* Drag a slot onto the clear zone to empty it.
* Under **Cockpit layout**, turn the **Top bar**, **Minimap**, **Telemetry strip** and **Proximity radar** on or off, and move each widget to a screen zone.
Click **Done** to save to the active loadout.
## Immersive mode
**Immersive** (on the safety band) takes the Cockpit full screen, hides the top bar and Fleet sidebar, and keeps the screen awake. Leave it with Esc, the exit chevron, gamepad Start, a click on the minimap, or by switching tabs.
## Next steps
Pre-flight checks and safe operating practice.
Instruments, map, Fly Here and the action panel.
Transports, streams and recording.
Build a mission to fly from here.
This documentation is built and hosted on [Mintlify](https://mintlify.com), a developer documentation platform.