> ## Documentation Index
> Fetch the complete documentation index at: https://docs.altnautica.com/llms.txt
> Use this file to discover all available pages before exploring further.
# Dashboard
> The main view showing your fleet, drone cards, and live map.
The Dashboard is the first screen you see when you open Mission Control. It shows all connected drones, their live positions on a map, and quick-access telemetry cards.
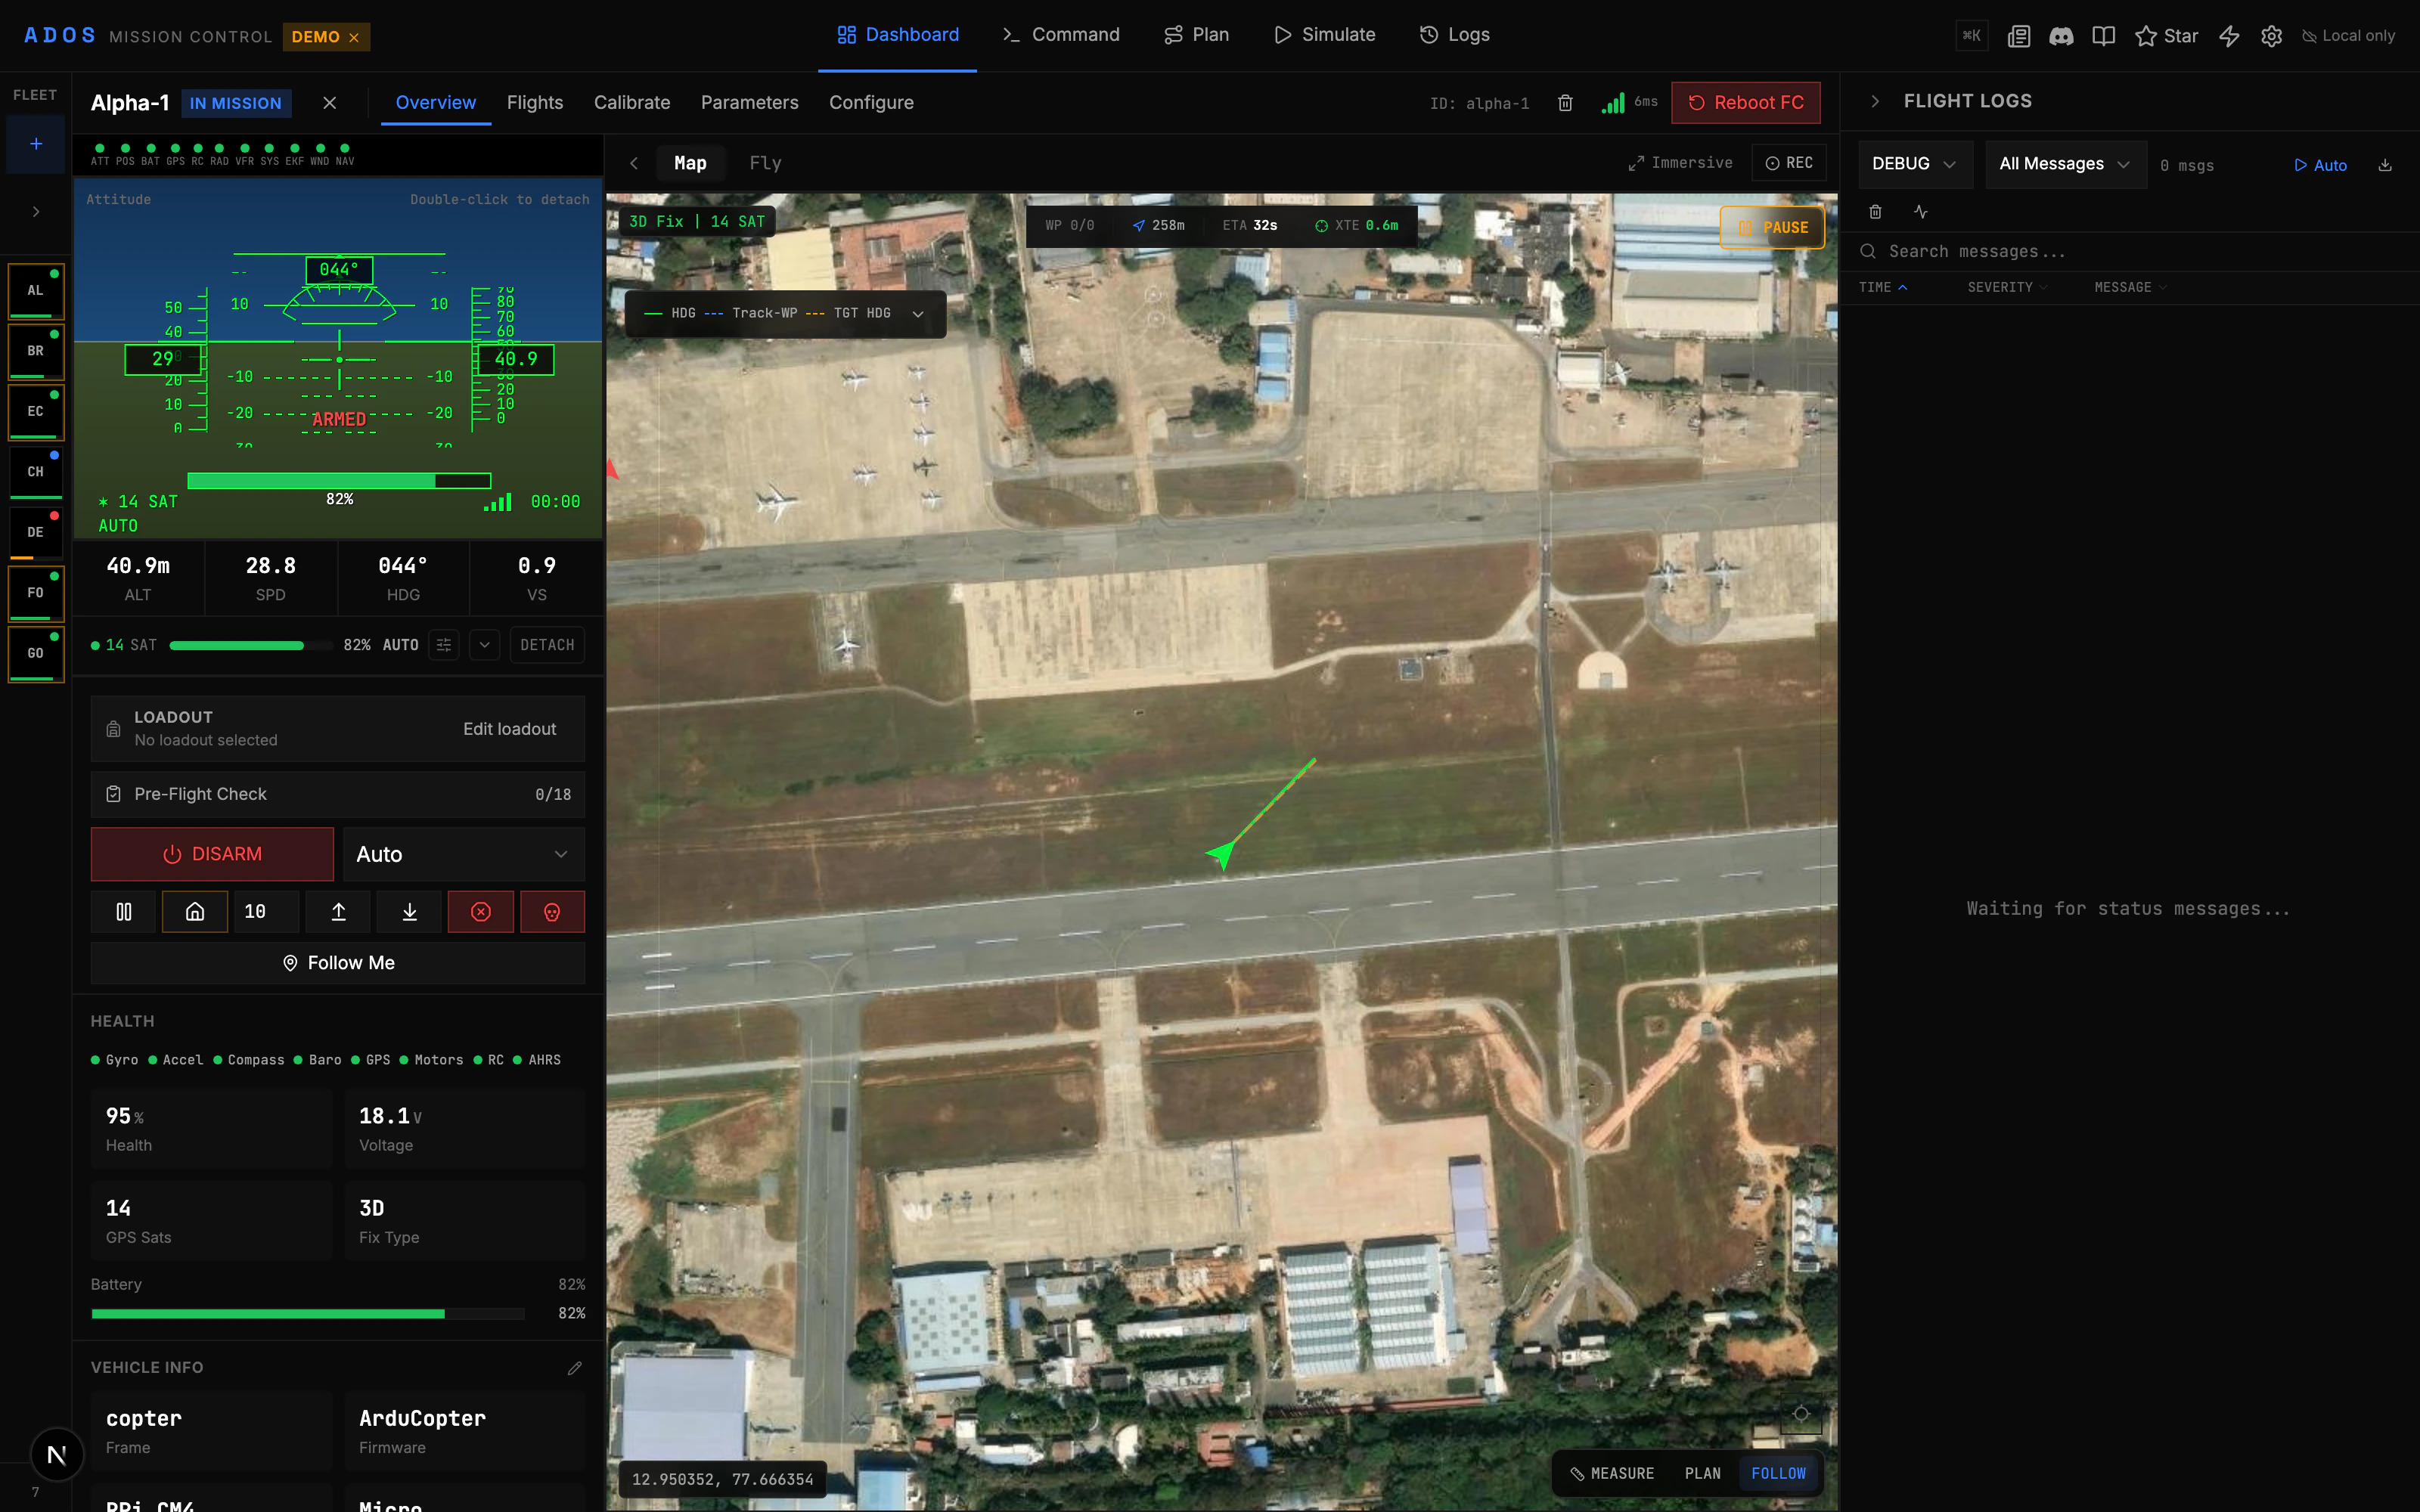 ## Layout
The dashboard has three main areas:
1. **Drone List Panel (left):** A scrollable list of all connected drones. Each card shows the drone's name, firmware type, flight mode, armed state, and battery level.
2. **Map (center):** A Leaflet map showing live drone positions with heading indicators. Supports OpenStreetMap, satellite, terrain, and dark tile sources.
3. **Drone Detail Panel (right):** Expanded information about the selected drone, including telemetry, GPS, battery, and quick actions.
## Drone Cards
Each connected drone gets a card in the left panel. The card displays:
* **Connection status** (connected, degraded, disconnected)
* **Firmware badge** (ArduPilot, PX4, Betaflight, iNav)
* **Flight mode** (Stabilize, Loiter, Auto, etc.)
* **Armed state** with a color indicator (red when armed, gray when disarmed)
* **Battery percentage** with a color-coded bar
* **GPS status** showing fix type and satellite count
Click a drone card to select it. The map centers on that drone, and the detail panel updates.
## Map View
The map shows real-time drone positions. Each drone is represented by an icon that rotates to match its heading. As drones move, their position updates in real time from MAVLink telemetry.
**Map controls:**
* Zoom with scroll wheel or +/- buttons
* Pan by clicking and dragging
* Switch tile source (OSM, satellite, terrain, dark) from the map controls
**Map overlays:**
* Drone position and heading arrow
* Drone trail showing recent flight path
* Home position marker
* GCS location (if browser geolocation is enabled)
## Drone Detail Panel
Select a drone to see expanded information:
* **Attitude:** Roll, pitch, yaw with a compact HUD
* **Position:** Latitude, longitude, altitude (AGL and MSL)
* **Speed:** Ground speed and climb rate
* **Battery:** Voltage, current, remaining percentage, consumed mAh
* **GPS:** Fix type, satellite count, HDOP
* **Radio:** RSSI, remote RSSI, noise floor
* **EKF:** Status flags and variance ratios
## Demo Mode
In demo mode (`npm run demo`), the dashboard populates with seven simulated drones across three firmware families:
| Drone | Firmware | Status |
| -------------- | ------------------ | -------------------------------------------- |
| Alpha-1 | ArduPilot (Copter) | Flying a security patrol loop in Auto |
| Bravo-2 | ArduPilot (Copter) | Flying a survey grid in Auto |
| Echo-5 | ArduPilot (Copter) | Flying a search-and-rescue pattern in Guided |
| Charlie | ArduPilot (Copter) | Idle on the ground |
| Delta | PX4 (Copter) | Offline for maintenance |
| Foxtrot (iNav) | iNav (Copter) | Flying an iNav survey loop in Auto |
| Golf (iNav FW) | iNav (Fixed-wing) | Flying an iNav fixed-wing circuit in Auto |
Each flying drone generates realistic telemetry, including GPS noise, battery discharge, and radio signal variation. The idle and maintenance drones show how grounded and offline states render. This is useful for testing the UI, building dashboards, or learning the interface.
## Top Navigation
The top bar is consistent across the app. The primary tabs are:
* **Dashboard:** the fleet overview and live map (this screen)
* **Plan:** the mission planner
* **Simulate:** the 3D mission preview and replay
* **History:** recorded flight logs
The top bar also carries:
* **Connection button:** opens the connect dialog
* **Active drone selector:** switch between connected drones
* **Armed/Disarmed badge:** shows the selected drone's armed state
* **Settings gear:** opens the configuration pages
* **Quick links:** community chat, documentation, and the source repository
Agent and ground-station management is unified into the per-drone detail view on the Dashboard, so there is no separate Command tab.
## Fleet Management
When multiple drones are connected, the dashboard becomes a fleet overview. You can:
* See all drones at a glance in the list panel
* Click any drone to focus on it
* Monitor battery levels across the fleet
* Spot connection issues quickly (degraded or offline drones are highlighted)
In cloud mode, drones paired with your Convex backend appear automatically on the dashboard, even if they are on a different network. The Drone Agent pushes status updates through the cloud relay.
## Quick Actions
From the dashboard, you can:
* **Arm/Disarm** the selected drone (with safety confirmation)
* **Change flight mode** using the mode selector
* **Set home position** to the drone's current location
* Navigate to any other tab for the selected drone
## Keyboard Shortcuts
| Shortcut | Action |
| -------- | ----------------------- |
| `1-9` | Select drone by index |
| `M` | Toggle map fullscreen |
| `D` | Open drone detail panel |
| `C` | Open connect dialog |
## Layout
The dashboard has three main areas:
1. **Drone List Panel (left):** A scrollable list of all connected drones. Each card shows the drone's name, firmware type, flight mode, armed state, and battery level.
2. **Map (center):** A Leaflet map showing live drone positions with heading indicators. Supports OpenStreetMap, satellite, terrain, and dark tile sources.
3. **Drone Detail Panel (right):** Expanded information about the selected drone, including telemetry, GPS, battery, and quick actions.
## Drone Cards
Each connected drone gets a card in the left panel. The card displays:
* **Connection status** (connected, degraded, disconnected)
* **Firmware badge** (ArduPilot, PX4, Betaflight, iNav)
* **Flight mode** (Stabilize, Loiter, Auto, etc.)
* **Armed state** with a color indicator (red when armed, gray when disarmed)
* **Battery percentage** with a color-coded bar
* **GPS status** showing fix type and satellite count
Click a drone card to select it. The map centers on that drone, and the detail panel updates.
## Map View
The map shows real-time drone positions. Each drone is represented by an icon that rotates to match its heading. As drones move, their position updates in real time from MAVLink telemetry.
**Map controls:**
* Zoom with scroll wheel or +/- buttons
* Pan by clicking and dragging
* Switch tile source (OSM, satellite, terrain, dark) from the map controls
**Map overlays:**
* Drone position and heading arrow
* Drone trail showing recent flight path
* Home position marker
* GCS location (if browser geolocation is enabled)
## Drone Detail Panel
Select a drone to see expanded information:
* **Attitude:** Roll, pitch, yaw with a compact HUD
* **Position:** Latitude, longitude, altitude (AGL and MSL)
* **Speed:** Ground speed and climb rate
* **Battery:** Voltage, current, remaining percentage, consumed mAh
* **GPS:** Fix type, satellite count, HDOP
* **Radio:** RSSI, remote RSSI, noise floor
* **EKF:** Status flags and variance ratios
## Demo Mode
In demo mode (`npm run demo`), the dashboard populates with seven simulated drones across three firmware families:
| Drone | Firmware | Status |
| -------------- | ------------------ | -------------------------------------------- |
| Alpha-1 | ArduPilot (Copter) | Flying a security patrol loop in Auto |
| Bravo-2 | ArduPilot (Copter) | Flying a survey grid in Auto |
| Echo-5 | ArduPilot (Copter) | Flying a search-and-rescue pattern in Guided |
| Charlie | ArduPilot (Copter) | Idle on the ground |
| Delta | PX4 (Copter) | Offline for maintenance |
| Foxtrot (iNav) | iNav (Copter) | Flying an iNav survey loop in Auto |
| Golf (iNav FW) | iNav (Fixed-wing) | Flying an iNav fixed-wing circuit in Auto |
Each flying drone generates realistic telemetry, including GPS noise, battery discharge, and radio signal variation. The idle and maintenance drones show how grounded and offline states render. This is useful for testing the UI, building dashboards, or learning the interface.
## Top Navigation
The top bar is consistent across the app. The primary tabs are:
* **Dashboard:** the fleet overview and live map (this screen)
* **Plan:** the mission planner
* **Simulate:** the 3D mission preview and replay
* **History:** recorded flight logs
The top bar also carries:
* **Connection button:** opens the connect dialog
* **Active drone selector:** switch between connected drones
* **Armed/Disarmed badge:** shows the selected drone's armed state
* **Settings gear:** opens the configuration pages
* **Quick links:** community chat, documentation, and the source repository
Agent and ground-station management is unified into the per-drone detail view on the Dashboard, so there is no separate Command tab.
## Fleet Management
When multiple drones are connected, the dashboard becomes a fleet overview. You can:
* See all drones at a glance in the list panel
* Click any drone to focus on it
* Monitor battery levels across the fleet
* Spot connection issues quickly (degraded or offline drones are highlighted)
In cloud mode, drones paired with your Convex backend appear automatically on the dashboard, even if they are on a different network. The Drone Agent pushes status updates through the cloud relay.
## Quick Actions
From the dashboard, you can:
* **Arm/Disarm** the selected drone (with safety confirmation)
* **Change flight mode** using the mode selector
* **Set home position** to the drone's current location
* Navigate to any other tab for the selected drone
## Keyboard Shortcuts
| Shortcut | Action |
| -------- | ----------------------- |
| `1-9` | Select drone by index |
| `M` | Toggle map fullscreen |
| `D` | Open drone detail panel |
| `C` | Open connect dialog |