> ## Documentation Index
> Fetch the complete documentation index at: https://docs.altnautica.com/llms.txt
> Use this file to discover all available pages before exploring further.
# Firmware Flashing
> Flash ArduPilot, PX4, Betaflight, or iNav firmware from the browser.
Mission Control can flash firmware directly to your flight controller from the browser. No external tools needed. The firmware panel supports ArduPilot, PX4, Betaflight, and iNav with board auto-detection.
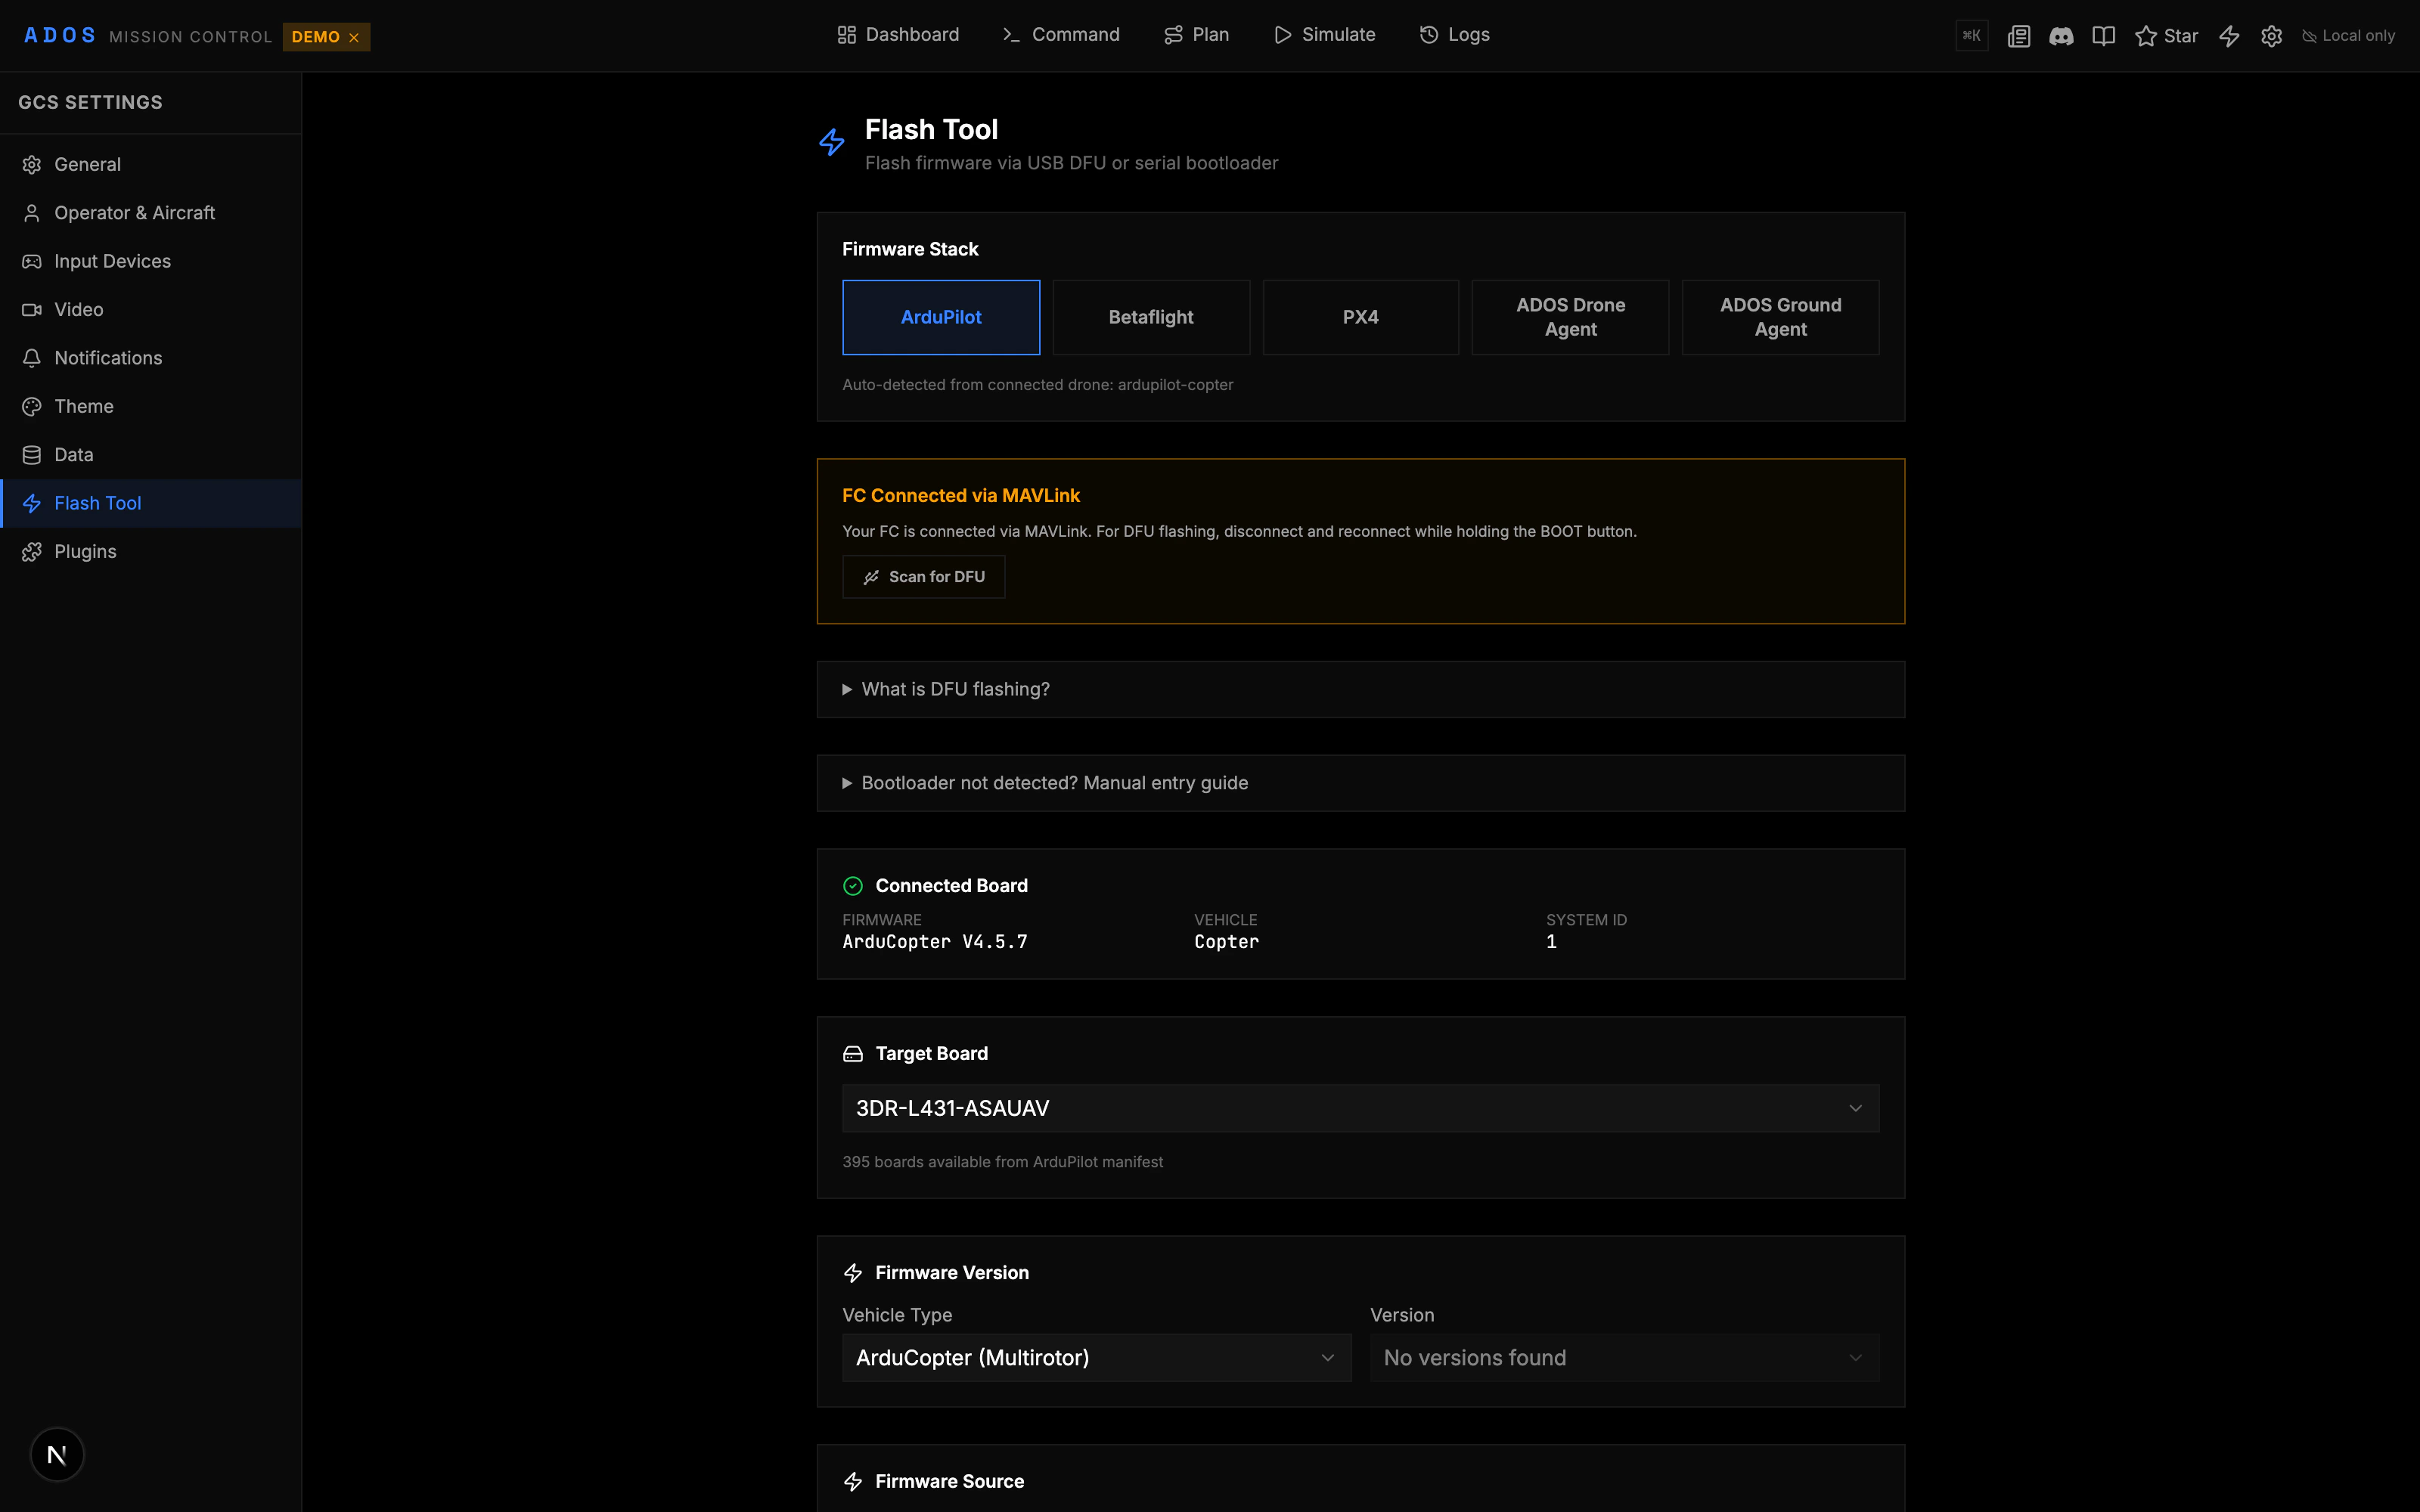 ## How It Works
Firmware flashing happens entirely in the browser, but the transport differs by firmware:
* **ArduPilot:** The board reboots into bootloader mode and the binary is written over WebUSB DFU (the STM32 DFU class). If a DFU device does not appear, the flasher falls back to the STM32 serial bootloader over WebSerial.
* **PX4:** PX4 does not use DFU. The `.px4` binary is written through the PX4 serial bootloader over WebSerial (the GET\_SYNC / PROG\_MULTI / GET\_CRC / REBOOT protocol).
* **Betaflight:** The board enters DFU mode via MSP command or manual boot button, and firmware is flashed via the STM32 DFU bootloader (WebUSB), with a serial-bootloader fallback.
* **iNav:** Same path as Betaflight. The board enters DFU mode via MSP command or manual boot button, and the iNav binary is flashed through the STM32 bootloader.
Firmware flashing uses the WebUSB API (for DFU) and the WebSerial API (for the serial bootloader paths). Both are available in Chrome 89+, Edge 89+, or another Chromium-based browser. Firefox and Safari support neither, so flashing is not available there.
## Flashing ArduPilot
Plug in the flight controller via USB and connect in Mission Control.
Navigate to Configure > Firmware in the sidebar.
The panel shows the detected board name, current firmware version, and board ID. This information comes from the `AUTOPILOT_VERSION` MAVLink message.
Choose the ArduPilot vehicle type (Copter, Plane, Rover, Sub) and version. Stable, beta, and development builds are available.
Click "Flash Firmware." The board reboots into bootloader mode. The progress bar shows the upload status. Do not disconnect during flashing.
After flashing, the board reboots with the new firmware. Reconnect and verify the version in the board info section.
## Flashing PX4
The PX4 section follows a similar flow:
1. Connect the FC and open the Firmware panel.
2. The PX4 section auto-detects PX4-compatible boards.
3. Select the PX4 version (stable or development).
4. Flash and wait for the progress bar to complete.
5. Reconnect after reboot.
## Flashing Betaflight
Betaflight flashing has a few extra considerations:
1. **Enter DFU mode:** Some boards require holding the boot button while plugging in USB. Others can enter DFU via an MSP command from the CLI panel.
2. Select the Betaflight target that matches your board.
3. Choose the firmware version.
4. Flash the firmware binary.
5. Reconnect after reboot.
Flashing the wrong firmware target can brick your flight controller. Always verify that the detected board matches the firmware target you select. If in doubt, check the board's documentation for the correct target name.
## Board Detection
Mission Control auto-detects the connected board using multiple methods:
| Method | Description |
| --------------------------- | ----------------------------------------------------- |
| MAVLink `AUTOPILOT_VERSION` | Board ID, firmware version, capabilities |
| MSP `BOARD_INFO` | Betaflight board identifier string |
| USB VID/PID | Vendor and product IDs from the WebSerial device info |
The detected board is matched against a built-in database of board profiles. Each profile maps a board ID to its physical output layout, timer groups, and default settings.
## Board Profiles
Mission Control includes profiles for popular flight controllers. A board profile contains:
* **Board name and ID** for auto-detection
* **Output mapping:** Which physical pins map to which motor/servo outputs
* **Timer groups:** STM32 timer assignments that determine which outputs share timers (affects DShot vs PWM mixing)
* **Protocol support:** Which output protocols each timer group supports (PWM, DShot, or both)
* **Notes:** Special outputs like solder pads, LED pads, or dedicated servo headers
The Outputs panel uses the board profile to render a timer group diagram, showing which outputs can run DShot and which share timers.
## Backup and Restore
Before flashing, back up your current parameters:
Go to the [Parameters panel](/mission-control/parameters) and click "Export." Save the `.param` file.
Follow the flashing steps above.
After reconnecting with the new firmware, go to Parameters and click "Import." Load your saved `.param` file. Review the diff and apply.
Some parameters change names or meaning between firmware versions. The import diff view highlights these conflicts so you can resolve them manually.
## DFU Mode
DFU (Device Firmware Upgrade) mode is a low-level bootloader state used for flashing. Different boards enter DFU differently:
| Method | When to use |
| --------------------------------- | --------------------------------------------------------------------------------------------------------------------------- |
| **Software reboot to bootloader** | Most boards support this via MAVLink or MSP command. The firmware panel triggers it automatically. |
| **Boot button** | Hold the boot/DFU button on the FC while plugging in USB. Useful when firmware is corrupted and cannot respond to commands. |
| **Boot pads** | Some boards have boot pads that must be shorted while powering on. Check your board's documentation. |
## Troubleshooting
Make sure the FC is powered and connected via USB. Try a different USB cable (data-capable, not charge-only). On Linux, check serial port permissions (`dialout` group).
Do not unplug the board. Try again. If the firmware is corrupted, enter DFU mode manually (boot button method) and reflash. The bootloader is separate from the main firmware and is not overwritten.
The auto-detection relies on board ID from the firmware. If you previously flashed the wrong target, the board ID may be incorrect. Use the manual board selection override to pick the correct target.
A major version upgrade (e.g., ArduPilot 4.4 to 4.5) may reset parameters. Always export your parameters before flashing. After flashing, import the backup and review the diff.
## How It Works
Firmware flashing happens entirely in the browser, but the transport differs by firmware:
* **ArduPilot:** The board reboots into bootloader mode and the binary is written over WebUSB DFU (the STM32 DFU class). If a DFU device does not appear, the flasher falls back to the STM32 serial bootloader over WebSerial.
* **PX4:** PX4 does not use DFU. The `.px4` binary is written through the PX4 serial bootloader over WebSerial (the GET\_SYNC / PROG\_MULTI / GET\_CRC / REBOOT protocol).
* **Betaflight:** The board enters DFU mode via MSP command or manual boot button, and firmware is flashed via the STM32 DFU bootloader (WebUSB), with a serial-bootloader fallback.
* **iNav:** Same path as Betaflight. The board enters DFU mode via MSP command or manual boot button, and the iNav binary is flashed through the STM32 bootloader.
Firmware flashing uses the WebUSB API (for DFU) and the WebSerial API (for the serial bootloader paths). Both are available in Chrome 89+, Edge 89+, or another Chromium-based browser. Firefox and Safari support neither, so flashing is not available there.
## Flashing ArduPilot
Plug in the flight controller via USB and connect in Mission Control.
Navigate to Configure > Firmware in the sidebar.
The panel shows the detected board name, current firmware version, and board ID. This information comes from the `AUTOPILOT_VERSION` MAVLink message.
Choose the ArduPilot vehicle type (Copter, Plane, Rover, Sub) and version. Stable, beta, and development builds are available.
Click "Flash Firmware." The board reboots into bootloader mode. The progress bar shows the upload status. Do not disconnect during flashing.
After flashing, the board reboots with the new firmware. Reconnect and verify the version in the board info section.
## Flashing PX4
The PX4 section follows a similar flow:
1. Connect the FC and open the Firmware panel.
2. The PX4 section auto-detects PX4-compatible boards.
3. Select the PX4 version (stable or development).
4. Flash and wait for the progress bar to complete.
5. Reconnect after reboot.
## Flashing Betaflight
Betaflight flashing has a few extra considerations:
1. **Enter DFU mode:** Some boards require holding the boot button while plugging in USB. Others can enter DFU via an MSP command from the CLI panel.
2. Select the Betaflight target that matches your board.
3. Choose the firmware version.
4. Flash the firmware binary.
5. Reconnect after reboot.
Flashing the wrong firmware target can brick your flight controller. Always verify that the detected board matches the firmware target you select. If in doubt, check the board's documentation for the correct target name.
## Board Detection
Mission Control auto-detects the connected board using multiple methods:
| Method | Description |
| --------------------------- | ----------------------------------------------------- |
| MAVLink `AUTOPILOT_VERSION` | Board ID, firmware version, capabilities |
| MSP `BOARD_INFO` | Betaflight board identifier string |
| USB VID/PID | Vendor and product IDs from the WebSerial device info |
The detected board is matched against a built-in database of board profiles. Each profile maps a board ID to its physical output layout, timer groups, and default settings.
## Board Profiles
Mission Control includes profiles for popular flight controllers. A board profile contains:
* **Board name and ID** for auto-detection
* **Output mapping:** Which physical pins map to which motor/servo outputs
* **Timer groups:** STM32 timer assignments that determine which outputs share timers (affects DShot vs PWM mixing)
* **Protocol support:** Which output protocols each timer group supports (PWM, DShot, or both)
* **Notes:** Special outputs like solder pads, LED pads, or dedicated servo headers
The Outputs panel uses the board profile to render a timer group diagram, showing which outputs can run DShot and which share timers.
## Backup and Restore
Before flashing, back up your current parameters:
Go to the [Parameters panel](/mission-control/parameters) and click "Export." Save the `.param` file.
Follow the flashing steps above.
After reconnecting with the new firmware, go to Parameters and click "Import." Load your saved `.param` file. Review the diff and apply.
Some parameters change names or meaning between firmware versions. The import diff view highlights these conflicts so you can resolve them manually.
## DFU Mode
DFU (Device Firmware Upgrade) mode is a low-level bootloader state used for flashing. Different boards enter DFU differently:
| Method | When to use |
| --------------------------------- | --------------------------------------------------------------------------------------------------------------------------- |
| **Software reboot to bootloader** | Most boards support this via MAVLink or MSP command. The firmware panel triggers it automatically. |
| **Boot button** | Hold the boot/DFU button on the FC while plugging in USB. Useful when firmware is corrupted and cannot respond to commands. |
| **Boot pads** | Some boards have boot pads that must be shorted while powering on. Check your board's documentation. |
## Troubleshooting
Make sure the FC is powered and connected via USB. Try a different USB cable (data-capable, not charge-only). On Linux, check serial port permissions (`dialout` group).
Do not unplug the board. Try again. If the firmware is corrupted, enter DFU mode manually (boot button method) and reflash. The bootloader is separate from the main firmware and is not overwritten.
The auto-detection relies on board ID from the firmware. If you previously flashed the wrong target, the board ID may be incorrect. Use the manual board selection override to pick the correct target.
A major version upgrade (e.g., ArduPilot 4.4 to 4.5) may reset parameters. Always export your parameters before flashing. After flashing, import the backup and review the diff.