

ADOS uses “pairing” for three separate things. A ground station normally needs the first two.
- Mission Control pairing gives one Mission Control owner an API key for the node. See Pairing.
- Air-link pairing (WFB-ng bind) exchanges radio keys between a drone and a ground station. See WFB-ng pairing.
- Mesh pairing joins a relay to a receiver in a ground mesh. See Build a mesh.
Mesh capability
A node takes therelay or receiver role only when it is mesh-capable: it carries two or more WFB-class radios (RTL8812EU or RTL8812AU, recognised by USB ID or driver). The agent checks the attached radios live on every role change and status read, so plugging in the second adapter is enough. Onboard Wi-Fi and adapters with other chipsets do not count.
The mesh dependencies (batctl, wpasupplicant) come with every ground-station install.
On a node that is not mesh-capable, a change to relay or receiver returns 409 with E_MESH_NOT_CAPABLE, and GET /api/v1/ground-station/role reports "mesh_capable": false. A change to direct is always allowed.
Bring up a receiver
Do the receiver first. A relay pairs with a receiver, so it cannot join a mesh that has none. A receiver needs no prior pairing. On its first start in the role it generates the mesh identity: the mesh id (/etc/ados/mesh/id) and a 32-byte shared key (/etc/ados/mesh/psk.key, mode 0600).
Set the role from Mission Control (node panel, Mesh & RX), from the LCD Mesh page (tap Switch role, then tap RECEIVER twice), or over REST:
receiver to /etc/ados/mesh/role, clears stale mesh state, and starts the new services with ados-batman first, because the receive side binds to the mesh interface. The single-node receive unit, ados-wfb-rx, runs only in the direct role.
What then runs on the receiver:
The receiver advertises
_ados-receiver._tcp on bat0, so relays find it with no manual configuration.
FEC combine
The Reed-Solomon FEC combine runs at the receiver. With the radio defaults of 8 data fragments in a block of 12, the receiver rebuilds a block from any 8 of the 12 fragments, whichever radio heard them.Cloud uplink election
Any mesh node with a working uplink (Ethernet, Wi-Fi client or a cellular modem) can advertise itself as the mesh’s cloud gateway. The receiver picks the best one by batman-adv link quality and routes cloud traffic through it, and moves to the next one when a gateway drops. To pin a gateway, see Local mesh (batman-adv).Mesh pairing
A relay learns which receiver to forward to, the mesh id and the shared key during mesh pairing. Pairing is local: no cloud service is involved.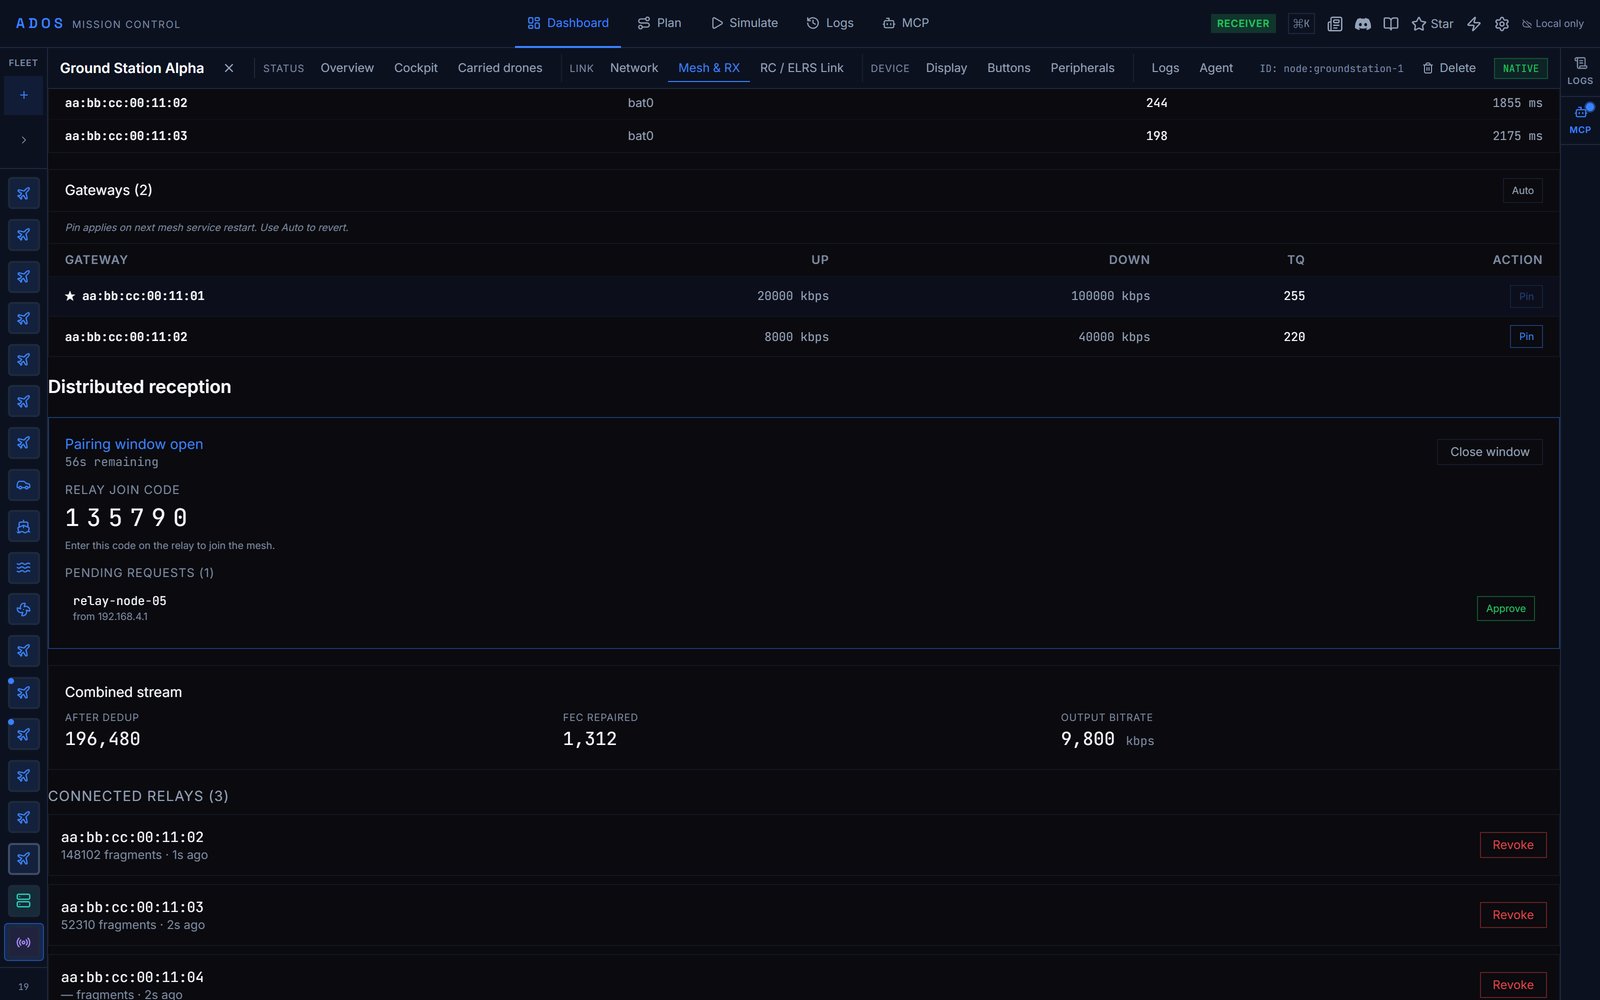
Mesh pairing in Mission Control, with an open accept window and its join code.
1
On the receiver: open the accept window
In Mission Control, open the receiver’s node panel, Mesh & RX, and open the accept window. The window lasts 60 seconds by default and shows a six-digit join code. Over REST:
duration_s accepts 5 to 300. Only a receiver can open the window; another role gets 409 E_WRONG_ROLE.2
On the relay: join with the code
The relay must be in the
direct or relay role. Join from its node panel in Mission Control, or over REST:3
On the receiver: approve
The relay’s device id appears in the pending list (Mission Control, or
GET /api/v1/ground-station/pair/pending). Approve it:4
The relay stores the invite
The relay decrypts the invite with its one-time key and the join code, and writes
/etc/ados/mesh/id, /etc/ados/mesh/psk.key (mode 0600), /etc/ados/mesh/receiver.json and the drone receive key. It also keeps its join key, the join code and its join port in /etc/ados/mesh/relay-rekey.json (mode 0600), so it can open a re-keyed bundle later.POST /api/v1/ground-station/pair/close.
Pairing does not change the relay’s role. Continue with Add a relay.
Pairing protocol
The request is
{"type": "join", "device_id": "<id>", "pubkey_hex": "<32 bytes hex>"}. The join code never goes on the wire. The relay generates a fresh key pair for every attempt. The key pair of the attempt that succeeds is kept for re-keying (see revocation below); the others are discarded.
The reply is 32 bytes of the receiver’s one-time public key, a 12-byte nonce, then the ciphertext and its 16-byte tag. The plaintext carries the mesh id, the shared key, the drone channel, the drone receive key, the receiver’s mDNS host and port, and issued_at_ms plus expires_at_ms.
The receiver sends the reply twice, 100 ms apart, because a single lost datagram on a lossy mesh should not force a retry. The relay keeps the first copy that opens. A relay resolves the receiver over mDNS and falls back to a broadcast on bat0; it takes replies only from the receiver it resolved. After five replies that do not open under the code, the join stops with E_INVITE_REJECTED: check the code and join again.
Security model
The threat model is an operator with physical access to both nodes for one minute. Capture-and-replay against past pairings and side channels are out of scope. In scope:- Receiver authentication through the join code. Any node that overhears a broadcast join request learns the relay’s public key, but the session key also binds the six-digit code shown on the receiver, so only that receiver can seal an invite that opens.
- Confidentiality. The reply opens only with the relay’s one-time private key, so a passive listener on the same mesh cannot read it.
- Authenticated encryption. ChaCha20-Poly1305 detects any tampering.
- Invite expiry. 120 seconds; a replayed invite is rejected.
-
Revocation. Revoke a relay from its card in the receiver’s Mesh & RX tab in Mission Control, or over REST on the receiver:
Revoked ids persist in
/etc/ados/mesh/revocations.json(mode0600), and a later join from that device is dropped before it reaches the pending list. A new revocation also rotates the mesh id and shared key, re-seals the new bundle to every relay that is still paired (to the key and join code each relay joined with, sent twice to its join port), and restartsados-batman. Each remaining relay listens on its join port, applies a bundle that opens and is newer than the one it holds, and restarts its ownados-batman. The revoked relay’s copy of the key stops working.
Add a relay
After mesh pairing, change the relay’s role. Changing torelay before pairing returns 409 E_NOT_PAIRED, because the mesh service has no mesh id or key to join with.
ados-batman first, then ados-wfb-relay.
A relay forwards what it hears rather than decoding it, so the combined stream lives on the receiver. Point Mission Control and browsers at the receiver for video.
Verify the mesh
On the relay:receiver_ip, receiver_port, fragments_seen, fragments_forwarded and up: true. If up stays false, the relay has not found the receiver over mDNS: check that the receiver is up and both nodes see each other (sudo batctl n).
Go back to direct
Set the role todirect from Mission Control, the LCD Mesh page, or REST:
direct to /etc/ados/mesh/role, clears the mesh runtime snapshots, and brings ados-wfb-rx back up.
The mesh identity stays on disk, so a later switch back to relay resumes without pairing again. A factory reset wipes it.
Next steps
Local mesh (batman-adv)
The mesh carrier and gateway election.
Mesh troubleshooting
When relays do not pair or the mesh does not form.