

Before you start
- Choose a mode.
optical_flowif the drone has a downward rangefinder,optical_flow_degradedif it doesn’t. See Modes and fallback. - Mount and wire the hardware. A downward camera, plus the rangefinder for
optical_flow. See Hardware. - Check the versions. The drone runs Drone Agent 0.99.125 or newer (check with
ados version) and you use Mission Control 0.56.0 or newer. - Check the board. The drone’s board must be in the extension’s board list on the Extensions catalog.
Install from Mission Control
- Open the drone, go to Agent, and under Software click Extensions. A drone with nothing installed shows “No extensions installed on this drone yet.”
- Pick the source:
- From the registry. Find ADOS Vision Navigation in the list of available extensions and click Install. The drone fetches the signed archive itself, so this needs a LAN path from Mission Control to the drone.
- From a file. Click Install extension on this drone (or Install from file) and choose a downloaded
.adosplug. Mission Control sends it over the LAN when it can reach the drone, and through the cloud relay when it can’t.
- Read the review page. It shows the description, compatibility, the permissions, the flight controller parameters the extension expects, the publisher and signer, and the resource impact.
- Click Install. The button names how many permissions the install grants.
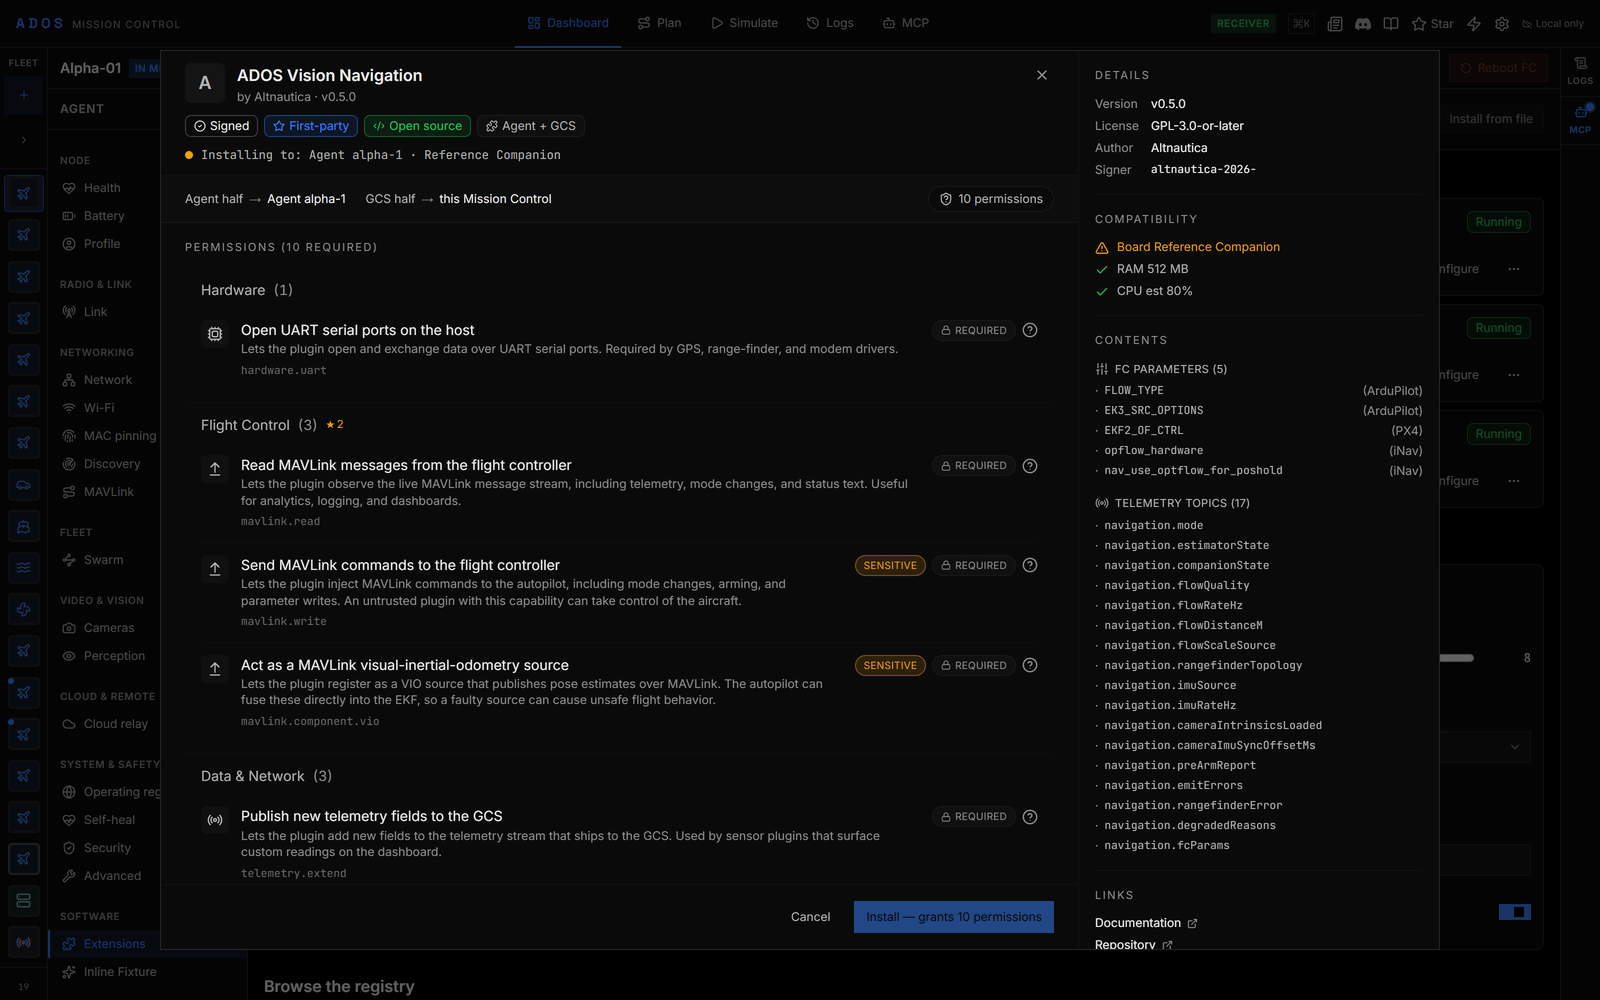
The install review for Vision Navigation.
event.publishhardware.uartmavlink.component.viomavlink.readmavlink.writetelemetry.extendtelemetry.subscribe.navigationui.slot.flight-skillui.slot.node-detail-tabvision.frame.read
cm4, cm5, rock-5c-lite, rk3588s2, rk3576, rpi5
If the drone is armed, Mission Control asks you to confirm before it installs, enables, disables or removes an extension.
Install from the agent CLI
On the drone, install the signed archive from its release URL or a local file:--yes refuses it; approve it interactively. See Extensions on the agent.
Set the per-drone config
A fresh install starts in modeoff and sends nothing to the flight controller. Write the config through the agent’s plugin config route. On the drone itself no key is needed:
http://192.168.1.50:8080/... with -H "X-ADOS-Key: $ADOS_KEY". An object value such as rangefinder replaces the whole object, so send every field you want to keep.
The plugin checks its stored config once a second. When a value changes, it exits and its unit restarts it on the new config within a few seconds. A config naming an unknown mode or a sideways camera in an optical-flow mode is rejected, and the plugin runs disengaged.
Enable the extension
On the extension’s row on the drone’s Extensions page, click Enable. Within a few seconds a Vision Nav tab appears on the drone. Configure on the same row opens the extension’s detail page (overview, permissions and events). Uninstall is in the row’s menu. The Engage Skill (default keyShift+N) turns vision navigation on and off from the cockpit. It asks for confirmation before it engages, and writes active in the per-drone config.
What you have now
- The plugin runs as its own sandboxed unit on the drone, with up to 512 MB RAM, 80% of a CPU core and 24 processes.
- In an optical-flow mode it sends flow to the flight controller at the camera frame rate once frames and a scale source are available.
- The Vision Nav tab shows the mode, the sensors, the estimator state, flow health and the pre-arm checks.
Uninstall
Click Uninstall in the extension row’s menu. The drone stops the plugin, removes it and clears its data on that drone, and the flight controller stops receiving flow. From the CLI,ados plugin remove com.altnautica.vision-nav does the same; add --keep-data to keep the data directory (and any camchain.yaml).
If the install fails
- “Not compatible with this drone’s board” or “Requires agent v…”: the drone’s board or agent version does not match the manifest. Upgrade the agent or use a supported board.
- Stuck at Downloading: the drone can’t reach the release URL. Check its outbound HTTPS.
- Fails at Verifying: the signature does not verify against a trusted key, or the signer is revoked. Download the archive again from the release page.
- The tab stays empty after enabling: the plugin sees no frames. Check that the vision host captures the downward camera, then read the plugin log with
ados plugin logs com.altnautica.vision-nav.
Next steps
Flight controller setup
Set the flight controller parameters and check pre-arm.
Hardware
Camera and rangefinder choices.